>>> 博客原文
Preface 前言
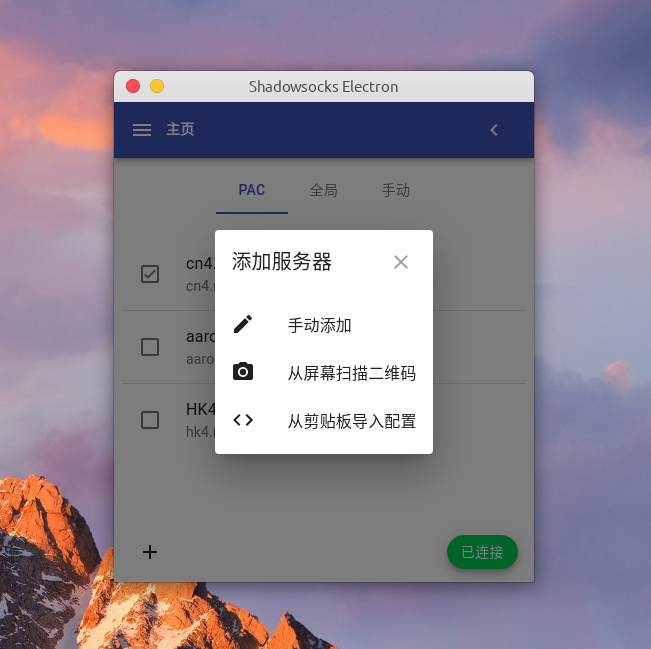
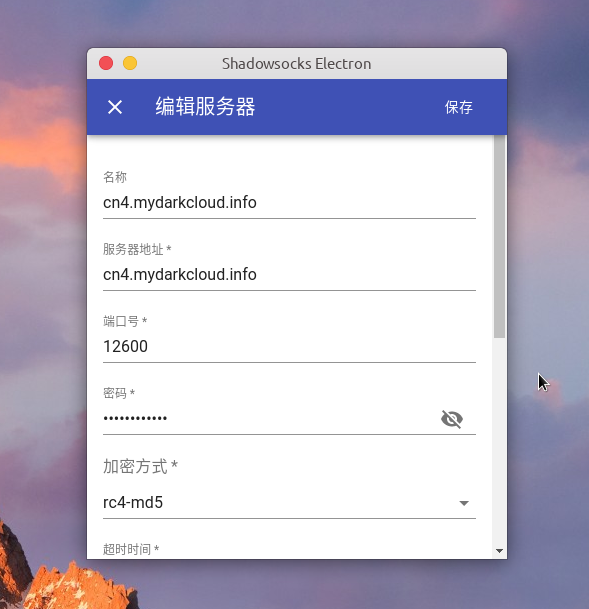
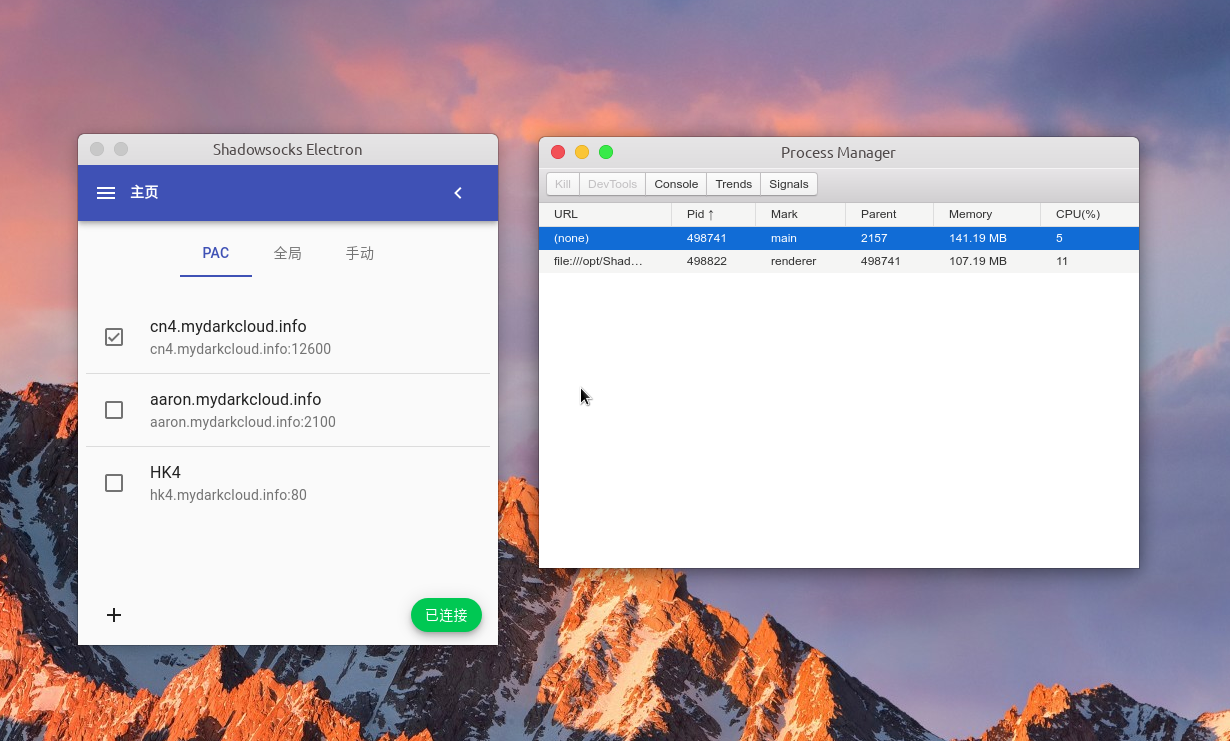
最近闲逛 github 时看到一个 shadowsocks-electron 项目,该工具支持 Linux / Mac 平台,是用来连接 shadowsocks 服务器的 proxy✈️,程序员应该大多都用过,各个平台也都有适配客户端。原作者使用 Typescript/Electron 把功能开发了一部分就没有维护了,只支持了基本的:添加、修改、连接、删除 proxy 和设置功能,开机自启也只适配了 Mac。
由于最近在学习 Typescript 语言苦于没有实践机会,加之我自己的 Ubuntu20.04 操作系统运行 electron-ssr 老有问题(可以使用很久没有维护已经下架官方软件源的Shadowsocks-QT进行替代🤣),所以萌生了自己接盘进行开发的想法,然后就是 fork -> clone -> dev(day after day) -> compile -> push 一顿操作。
github仓库:shadowsocks-electron
Prevew 预览
Contents 目录
工具和技术
项目基于 Typescript@3.8.3 / React@16.13.1 / MaterialUI@4.9.8 / Electron@13.4.0
1. 低配置快速启动前端开发环境:react-app-rewired 此工具可以在不 ‘eject’ 也不创建额外 react-scripts 的情况下修改 create-react-app 内置的 webpack 配置,然后你将拥有 create-react-app 的一切特性,且可以根据你的需要去配置 webpack 的 plugins, loaders 等。
通过 npm 安装:
1 $ npm install react-app-rewired --save-dev
根目录中创建一个 config-overrides.js 参考官方说明进行配置,注意 npm 上也有很多基于 react-app-rewired 的专用插件用于分离解决各个原子化功能,可以自行探索哦。
1
2
3
4
5
6
7
8
9
10
11
12
13
14
15
16
17
18
19
20
21
22
23
24
25
26
27
28
29
30
31
32
33
34
35
const { override , useBabelRc, removeModuleScopePlugin, babelInclude, setWebpackTarget } = require ("customize-cra" ); const path = require ("path" );const rewireSvgReactLoader = require ('react-app-rewire-svg-react-loader' );module .exports = { webpack : override ( useBabelRc (), (config, env ) => { config = rewireSvgReactLoader (config, env); return config; }, removeModuleScopePlugin (), babelInclude ([path.resolve ("renderer" )]), setWebpackTarget ("electron-renderer" ) ), paths : function (paths, env ) { paths.appIndexJs = path.resolve (__dirname, "renderer/index.tsx" ); paths.appSrc = path.resolve (__dirname, "renderer" ); paths.appTypeDeclarations = path.resolve ( __dirname, "renderer/react-app-env.d.ts" ); return paths; } };
2. 代码更改自动重启:nodemon 在开发 Node.js 项目时我经常用它来监听文件更改然后自动重启应用,Electron 应用中也可以使用。在 package.json 中配置相关的字段然后让 nodemon 监听主进程代码并进行 Typescript 实时编译和 Electron 主进程重启。
1
2
3
4
5
6
7
8
9
10
11
12
13
14
15
16
17
18
19
{ "name" : "shadowsocks-electron" , ... "scripts" : { "start:main" : "nodemon" , ... } , "nodemonConfig" : { "watch" : [ "main" ] , "ignore" : [ "main/types/**/*" ] , "ext" : "ts,json" , "exec" : "yarn build:main && electron ." } , ... }
3. 数据持久化:redux-persist/redux-persist-electron-storage Electron 应用常常涉及一些持久化数据的功能,比如在 shadowsocks-electron 中的服务器配置读写、日志保存和用户设置保存等。之前在开发一个类似百度网盘的文件上传功能时,需要保存文件上传记录,当时选用了 lowdb 进行支持,它是一种 JSON 文件数据库,提供类似数据库的功能但是使用 JSON 字符串进行明文存储。这种存储方式性能自然很一般,不过已经能满足至多保存 5000 条上传记录的需求了。
由于类似 lowdb 这种工具只能在 Electron 主进程端进行操作,因为 UI 渲染进程和主进程的数据同步操作就会显得格外冗余。
为了简化数据交互并能达到持久化存储的目的,可以选用 redux-persist 为解决方案。引入之后它可以和 Redux 状态管理库无缝配合,无需手动触发多余的数据存取操作。我们只需要在前端代码中关注 Reducer 和 Action 的编写即可,所有的持久化操作都是透明不可见的。
redux-persist 底层依赖了 Electron 渲染进程原生的 remote 远程调用进行实现,前端 store 中的数据最终会被存放到 Electron 进程运行路径下的某个文件里,应用开启的时候这些数据又会从文件中读取到 store中。
不过正是由于 redux-persist 采用了 remote 远程调用这种通信方式,导致我的应用不能使用最新发布的 Electron 版本,转而使用支持 remote API 的 13.4.0 版本。我看了一下它的 github 仓库,README 中说现在是无人维护的状态,希望有开源爱好者用爱发电自行维护。其实要去解决的话也有办法,虽然 Electron 官方移除了这个 API,但是可以通过安装第三方包 @electron/remote/main 来支持。
废话不多说,以下是 redux-persist 的简单配置使用:
1 2 3 4 5 6 7 8 9 10 11 12 13 14 15 16 17 18 19 20 21 22 23 24 25 26 27 28 29 30 import { createStore, applyMiddleware, compose } from "redux" ;import Store from 'electron-store' ;import thunk from 'redux-thunk' ;import { persistReducer, persistStore, PersistConfig } from "redux-persist" ;import autoMergeLevel2 from "redux-persist/lib/stateReconciler/autoMergeLevel2" ;import createElectronStorage from "redux-persist-electron-storage" ;import rootReducer from "./reducers" ;import { RootState } from "../types" ;const persistConfig : PersistConfig <RootState > = { key : "root" , storage : createElectronStorage ({ electronStore : new Store () }), stateReconciler : autoMergeLevel2, blacklist : ["status" ] }; const persistedReducer = persistReducer (persistConfig, rootReducer);export const store = createStore ( persistedReducer, compose ( applyMiddleware (thunk), (window as any ).devToolsExtension ? (window as any ).devToolsExtension () : (f: any ) => f ) ); export const persistor = persistStore (store as any );
在 App.tsx 中引入:
1
2
3
4
5
6
7
8
9
10
11
12
13
14
15
16
17
18
19
20
21
22
23
24
25
26
27
import { store, persistor } from "./redux/store" ;... const App : React .FC = () => { ... return ( <Provider store ={store} > <PersistGate loading ={ <Loading /> } persistor={persistor}> <ThemeProvider theme ={darkMode ? darkTheme : mainTheme }> <HashRouter > <div className ={styles.root} > <AppNav /> <main className ={styles.content} > <div className ={styles.toolbar} /> <Switch > <Route path ="/home" > <HomePage /> </Route > ... </Switch > </main > </div > </HashRouter > </ThemeProvider > </PersistGate > </Provider > ); }
4. 项目打包:electron-builder 一直用这个打包 Electron 应用,挺好用的工具,支持多平台(win / darwin / linux…)、多架构(arm64 / amd / aarch64…)、多包格式(zip / exe / deb / AppImage / dmg / pkg / snap / nsis…),甚至是应用打包更新等功能支持,总之非常强大。
官方文档还算是写的简介明了,这里给个 DOC 地址:electron-builder 。
可以将 electron-builder 的配置一同写入 package.json 文件中,不过为了配置分离化易于管理也可单独编写 electron-builder.json 配置文件:
1
2
3
4
5
6
7
8
9
10
11
12
13
14
15
16
17
18
19
20
21
22
23
24
25
26
27
28
29
30
31
32
33
34
35
36
37
38
39
40
41
42
43
44
45
46
47
48
49
50
51
52
53
54
{ "appId" : "io.robertying.shadowsocks-electron" , "productName" : "Shadowsocks Electron" , "asar" : false , "copyright" : "© 2020 nojsja" , "files" : [ "assets/**/*" , "bin/**/*" ] , "extraFiles" : [ { "from" : "bin/${os}/${arch}" , "to" : "bin" , "filter" : [ "!.gitignore" ] } ... ] , "mac" : { "target" : [ { "target" : "dmg" , "arch" : "x64" } , ... ] , "icon" : "assets/icon.icns" , "category" : "public.app-category.utilities" , ... } , "linux" : { "icon" : "assets/icon.png" , "target" : [ "AppImage" , "deb" ] , "category" : "Network" , "executableName" : "shadowsocks-electron" , ... } , "deb" : { "depends" : [ "gconf2" , "gconf-service" , "libnotify4" , "libappindicator1" , "libxtst6" , "libnss3" , "shadowsocks-libev" ] } , "publish" : [ ... ] }
需要额外注意 :
1 2 3 $: npm config set electron_custom_dir "13.4.0" $: npm config set electron_mirror http://npm.taobao.org/mirrors/electron/
5. 客户端运行日志管理:winston 日志功能通常是一个完整的应用程序必不可少的模块,可以用于生产环境记录错误和告警,以便开发者在收到用户反馈时进行日志分析定位问题。
winston 被设计为一个简单且通用的日志库,支持多种传输器。 传输器本质上是日志的存储设备,每个 winston 日志实例都可以在不同级别配置多个传输器。 比如:将错误日志持久化存储在的远程位置(如数据库),另外把所有运行日志都输出到控制台或本地文件。
这里配合 winston 插件 winston-daily-rotate-file 使用,它可以更细粒度地进行日志分割、日志存储文件名自定义、日志压缩、过期日志清除等功能:
1
2
3
4
5
6
7
8
9
10
11
12
13
14
15
16
17
18
19
20
21
22
23
24
25
26
27
28
29
30
31
32
33
34
35
36
37
38
39
import path from "path" ;import { app } from "electron" ;import winston, { format } from "winston" ;import open from "open" ;import DailyRotateFile from 'winston-daily-rotate-file' ;const { combine, simple, colorize } = format;export const logDir = app.getPath ("logs" );const timestamp = format ((info, opts ) => { info.message = `${new Date ().toLocaleString()} - ${info.message} ` ; return info; }); const dailyTransport : DailyRotateFile = new DailyRotateFile ({ filename : path.resolve (logDir, 'shadowsocks-electron-%DATE%.log' ), datePattern : 'YYYY-MM-DD' , zippedArchive : false , maxSize : '10m' , maxFiles : '30d' }); const logger = winston.createLogger ({ level : "info" , transports : [ dailyTransport ] }); if (process.env .NODE_ENV !== "production" ) { logger.add ( new winston.transports .Console ({ format : combine (colorize (), timestamp (), simple ()) }) ); } export default logger;
Core Functions 关键功能解析
1. 解析 Shadowsocks 专用加密链接 客户端支持将 shadowsocks 加密链接如ss://cmM0LW1kNTp4TTBtY09kOVFubjVAY240Lm15ZGFya2Nsb3VkLmluZm86MTI2MDA 解析为服务器配置。解析 ss 链接其实并不复杂,ss 后面的字符串都是 base64 编码,使用 Base64 解码成正常格式 ss://method:password@server:port 之后使用正则匹配提取各个关键字段即可:
1
2
3
4
5
6
7
8
9
10
11
12
13
14
15
16
17
18
19
20
21
22
23
24
25
26
27
28
import { Base64 } from 'js-base64' ;... parseSSContent (uri : string): Proxy | null { ... let legacyRegex = new RegExp (`^(${ProxyURI.base64Pattern} )(#(.+))?$` , "gi" ); let match = legacyRegex.exec (uri) if (match && match.length >= 2 ) { let proxy = new Proxy (ProxyScheme .SS ); proxy.type = 'ss' ; proxy.remark = match[3 ]; let core = Base64 .decode (match[1 ]); let mainRegex = /^(.+?):(.+)@(.+?):(\d+)/gi let coreComps = mainRegex.exec (core); if (coreComps && coreComps[1 ] && coreComps[2 ] && coreComps[3 ] && coreComps[4 ]) { proxy.host = coreComps[3 ]; proxy.port = Number (coreComps[4 ]); proxy.authscheme = coreComps[1 ].toLowerCase (); proxy.password = coreComps[2 ]; return proxy; } return null ; } return null ; }
2. 将已有的服务器配置生成二维码图片进行分享
上一步解析成功后可以得到服务器配置,实例数据如下:
1
2
3
4
5
6
7
8
{ "remark" : "cn2.mydarkcloud.com" , "serverHost" : "cn2.mydarkcloud.com" , "serverPort" : 12322 , "password" : "xM0mcOd9Qn33" , "encryptMethod" : "rc4-md5" , "type" : "ss" }
要做二维码分享功能的话需要将配置信息组装成正常格式 ss://method:password@server:port,然后编码成 Base64 加密链接:
1
2
3
4
5
6
7
8
9
10
import { Base64 } from 'js-base64' ;... generateSS (host : string, port : number, method : string, password : string, remark?: string, isSIP002 : boolean = true ): string { let rawURI = method.toLowerCase () + ":" + password + "@" + host + ":" + port; let uri = ProxyScheme .SS + Base64 .encode (rawURI); if (remark) { uri += "#" + remark; } return uri; }
得到加密链接后,使用 qrcode 库将其输出成前端可直接展示的 dataURL 数据格式,然后界面上直接赋值给 img 标签的 src 属性即可:
1
2
3
4
5
6
7
8
9
10
11
12
13
14
15
16
17
18
19
import QRCode from 'qrcode' ;... const result = { code : 0 , result : { dataUrl : ' msg: ' } }; QRCode .toDataURL (url, function (err, _dataURL ) { if (!err) { result.result .dataUrl = _dataURL; } else { result.code = 500 ; result.result .msg = err.toString (); } resolve (result); });
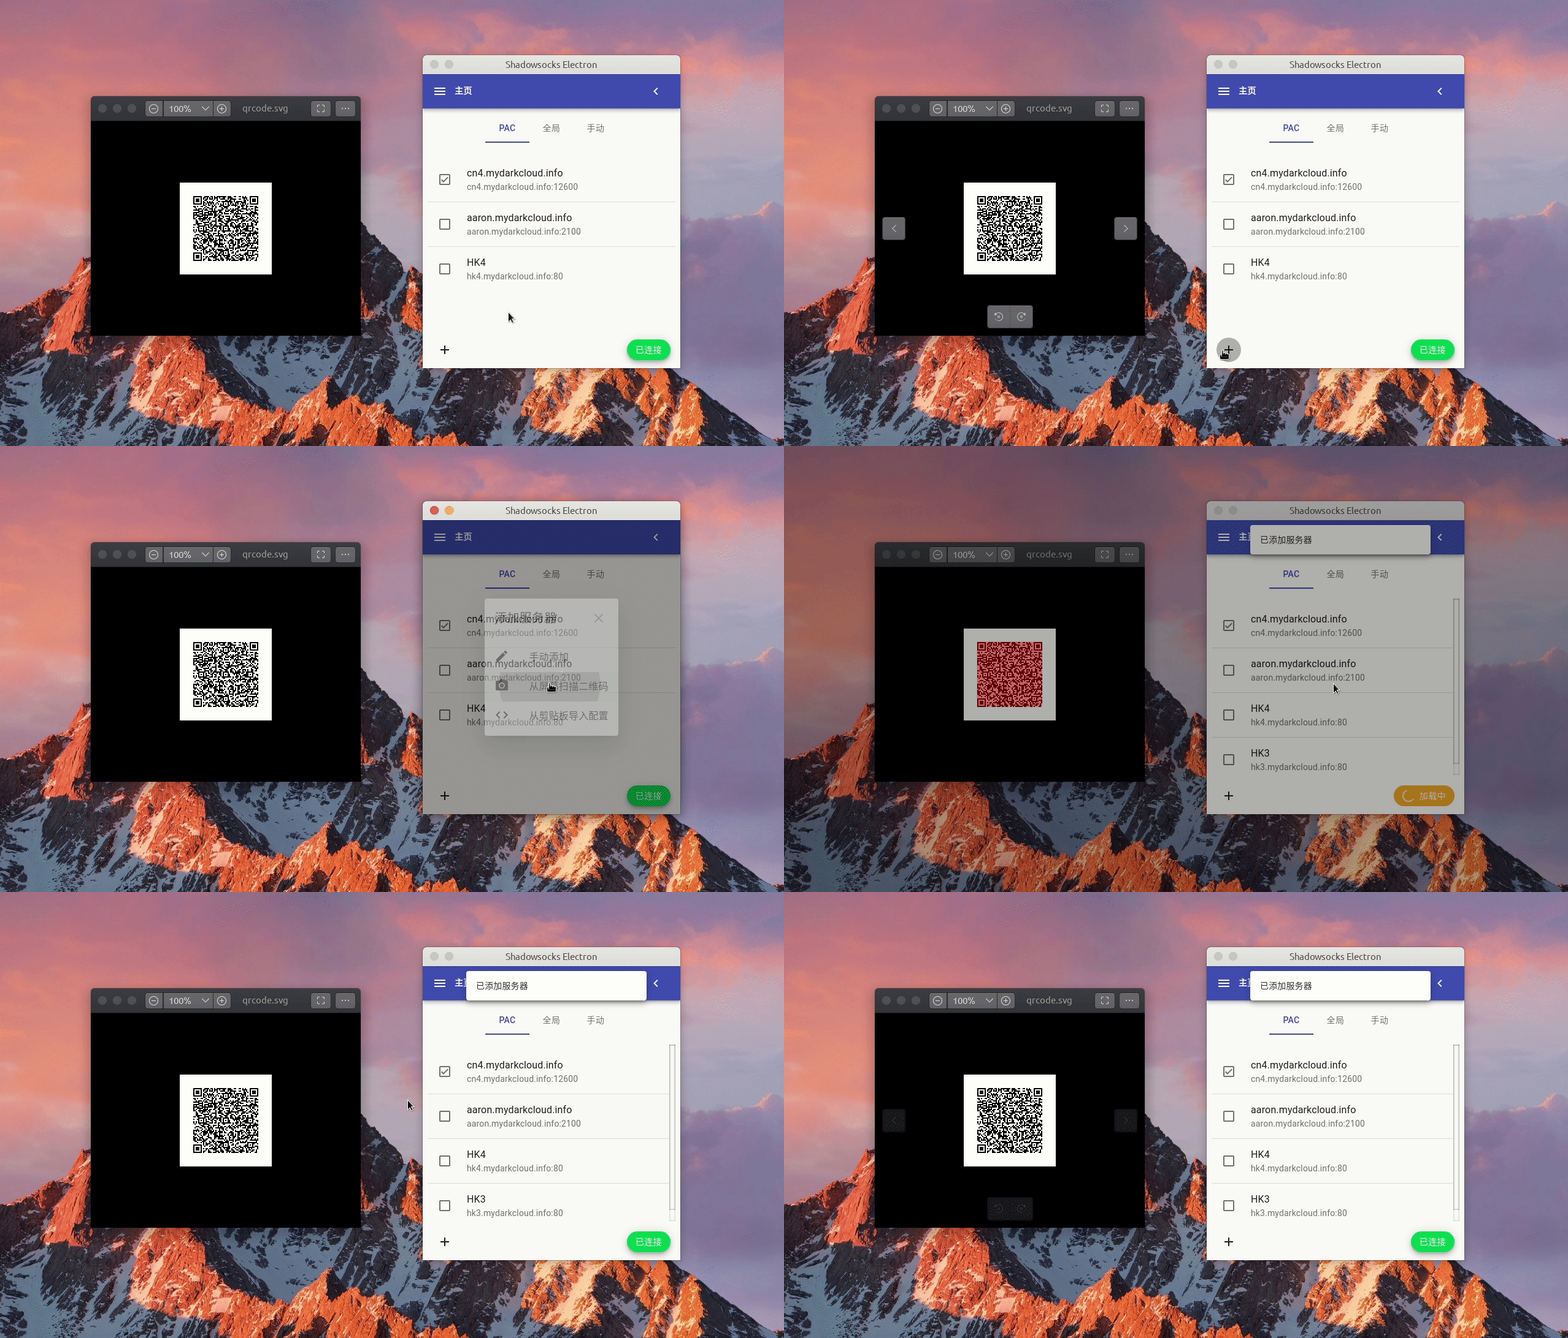
3. 读取二维码导入 Shadowsocks 服务器配置
扫描屏幕二维码导入功能实现起来稍复杂些。
第一步:先使用 Electron 自带 desktopCapture API 获取桌面截图文件:
1
2
3
4
5
6
7
8
9
10
11
12
import { desktopCapturer } from 'electron' ;... export function getScreenCapturedResources (Promise <Electron .DesktopCapturerSource []> { return desktopCapturer.getSources ({ types : ['screen' ], thumbnailSize : { width : window .screen .width * window .devicePixelRatio , height : window .screen .height * window .devicePixelRatio } }); }
第二步:将截图数据转换成 bitmap 位图格式(存储像素点颜色和透明度的数组[r,g,b,a …]),然后使用 jsqr 库解析位图中的二维码信息,最终会得到二维码位于屏幕中的坐标、宽度和文本值等信息:
1 2 3 4 5 6 7 8 9 10 11 12 13 14 15 16 17 18 19 20 21 22 23 24 25 26 27 28 29 30 31 32 export const getQrCodeFromScreenResources = (callback?: (added: boolean ) => void ): ThunkAction <void , RootState , unknown , AnyAction > => { return (dispatch ) => { getScreenCapturedResources ().then ((resources: Electron.DesktopCapturerSource[] ) => { if (resources && resources.length ) { const qrs : {x : number , y : number , width : number , height : number }[] = []; const values : string [] = []; resources.forEach (resource => const size = resource.thumbnail .getSize (); const capturedData = jsqr (resource.thumbnail .getBitmap () as any , size.width , size.height ); if (capturedData && capturedData.data ) { values.push (capturedData.data ); qrs.push ({ x : capturedData.location .topLeftCorner .x , y : capturedData.location .topLeftCorner .y , width : capturedData.location .topRightCorner .x - capturedData.location .topLeftCorner .x , height : capturedData.location .bottomLeftCorner .y - capturedData.location .topLeftCorner .y , }); } }); ... callback && callback (!!qrs.length ); } else { callback && callback (false ); } }); } };
第三步:发送二维码数据到主进程,主进程根据坐标和宽高信息生成办透明的全屏窗口(截图遮罩层),并在透明窗口加载的 js 文件中根据二维码坐标信息用 canvas 绘制高亮捕获区域:
1 2 3 4 5 6 7 8 9 10 11 12 13 14 15 16 17 18 19 20 21 22 23 24 25 26 27 28 29 30 31 32 33 34 35 import { app, BrowserWindow screen } from "electron" ;const screenSize = screen.getPrimaryDisplay ().workAreaSize ;const twin = new BrowserWindow ({ width : screenSize.width , height : screenSize.height , transparent : true , alwaysOnTop : true , fullscreen : true , frame : false , titleBarStyle : 'hidden' , ... }); twin.loadURL ('path/to/html' ); const { ipcRenderer } = require ('electron' );const screenWidth = window .screen .availWidth * window .devicePixelRatio ;const screenHeight = window .screen .availHeight * window .devicePixelRatio ;const $drawer = document .querySelector ('#drawer' );$drawer.width = screenWidth; $drawer.height = screenHeight; if (!drawer) return ;const ctx = drawer.getContext ('2d' );const {x, y, width, height} = p;if (ctx) { ctx.fillStyle = 'rgba(0, 0, 0, .3)' ; ctx.fillRect (0 , 0 , drawer.width , drawer.height ); ctx.fillStyle = 'rgba(255, 0, 0, .4)' ; ctx.fillRect (x, y, width, height); }
4. 多平台功能适配之 shadowsocks-libev 库的依赖处理 本桌面应用主要使用 shadowsocks-libev 跨平台库进行 proxy 的管理。
Ubuntu20.04 deb 构建方式中:由于依赖库可以直接从官方 apt 软件源中安装,因此不用在应用内部提供二进制可执行文件,只需在 electron-builder.json 中声明 deb 字段的依赖项目即可,用户安装 deb 安装包的时候会自动从软件源商店下载对应的依赖,参考上文 electron-builder.json 说明。
Ubuntu20.04 AppImage 构建方式中:需要将用到的 ss-local 命令的二进制执行文件集成到包内,并在执行命令时提供明确的二进制文件绝对地址,如:/path/to/ss-local。
Mac dmg / zip 构建方式中:Mac 中虽然也能通过包管理器 brew 来安装:brew install shadowsocks-libev,但是考虑到 brew 本身并不属于 Mac 操作系统开封即用的应用,可能有些用户 Mac 机没有安装,并且国内网络环境你懂得,普通用户安装它可能会网络错误。因此构建包中默认集成了 shadowsocks-libev 库中需要用到的 ss-local 二进制文件,详见项目路径:/bin/darwin/x64/ss-local。
以下是程序运行时获取 ss-local 可执行文件地址的多平台兼容处理代码作为参考:
1 2 3 4 5 6 7 8 9 10 11 12 13 14 15 16 17 18 19 20 21 22 23 24 25 26 27 28 29 30 31 32 export const getBinPath = (function ( let fullpath = new Map (); const paths = (process.env .PATH as string ).split (':' ); return (name: string ) => { if (fullpath.get (name)) { return fullpath.get (name) } for (let i = 0 ; i < paths.length ; i++) { if (fs.existsSync (path.join (paths[i], name))) { fullpath.set (name, path.join (paths[i], name)); break ; } } return fullpath.get (name); } })(); export const getSSLocalBinPath = ( switch (os.platform ()) { case 'linux' : return getBinPath ('ss-local' ); case 'darwin' : return path.join (app.getAppPath (), `bin/darwin/x64/ss-local` ); default : return getBinPath ('ss-local' ) ?? 'ss-local' ; } }
5. Electron 调用 shadowsocks-libev 库连接服务器 上一步说明了使用 ss-local 命令之前所做的兼容处理,现在需要使用 ss-local 命令 (shadowsocks 客户端) 来连接我们的服务器了。Electron 执行命令首先想到的是什么?没错就是 Node.js 的 child_process
spawn :child_process.spawn() 方法使用给定的 command 和 args 中的命令行参数衍生新进程。1 2 3 4 5 6 7 8 9 10 11 12 13 14 const { spawn } = require ('child_process' );const ls = spawn ('ls' , ['-lh' , '/usr' ]);ls.stdout .on ('data' , (data ) => { console .log (`stdout: ${data} ` ); }); ls.stderr .on ('data' , (data ) => { console .error (`stderr: ${data} ` ); }); ls.on ('close' , (code ) => { console .log (`child process exited with code ${code} ` ); });
exec : 衍生 shell,然后在该 shell 中执行 command,缓冲任何生成的输出。1 2 3 4 5 6 7 8 9 const { exec } = require ('child_process' );exec ('cat *.js missing_file | wc -l' , (error, stdout, stderr ) => { if (error) { console .error (`exec error: ${error} ` ); return ; } console .log (`stdout: ${stdout} ` ); console .error (`stderr: ${stderr} ` ); });
execFile :类似于 exec(),但是默认情况下它会直接衍生命令而不先衍生shell。exec() 和 execFile() 之间区别的重要性可能因平台而异,在 Unix 类型的操作系统上,execFile() 可以更高效,因为默认情况下不会衍生 shell。但是在 Windows 上, .bat 和 .cmd 文件在没有终端的情况下不能自行执行,因此无法使用 execFile() 启动。当在 Windows 上运行时,要调用 .bat 和 .cmd 文件,可以使用设置了 shell 选项的 child_process.spawn()、child_process.exec() 或衍生 cmd.exe 并将 .bat 或 .cmd 文件作为参数传入(也就是 shell 选项和 child_process.exec() 所做的)。1 2 3 4 5 6 7 const { execFile } = require ('child_process' );const child = execFile ('node' , ['--version' ], (error, stdout, stderr ) => { if (error) { throw error; } console .log (stdout); });
fork :child_process.fork() 方法是 child_process.spawn() 的特例,专门用于衍生新的 Node.js 进程。 与 child_process.spawn() 一样,返回 ChildProcess 对象。 返回的 ChildProcess 将有额外的内置通信通道,允许消息在父进程和子进程之间来回传递。注意创建个每个子进程都有自己的内存,具有自己的 V8 实例,由于需要额外的资源分配,不建议衍生大量子 Node.js 进程。1 2 3 4 5 6 7 8 9 10 11 12 13 14 if (process.argv [2 ] === 'child' ) { setTimeout (() => { console .log (`Hello from ${process.argv[2 ]} !` ); }, 1_000 ); } else { const { fork } = require ('child_process' ); const controller = new AbortController (); const { signal } = controller; const child = fork (__filename, ['child' ], { signal }); child.on ('error' , (err ) => { }); controller.abort (); }
此项目中使用 spawn 方式创建子进程来执行 ss-local 命令连接服务器:
1 2 3 4 5 6 7 8 9 10 11 12 13 14 15 16 17 18 19 20 21 22 23 24 25 26 27 28 29 30 31 32 33 34 35 36 37 38 39 40 41 42 43 44 45 46 47 48 49 50 51 52 53 54 55 56 57 58 59 60 const spawnClient = async (config : Config , settings : Settings ) : Promise <{code : number , result : any }> => { const sslocalPath = getSSLocalBinPath (); const args = [ "-s" , config.serverHost , "-p" , config.serverPort .toString (), "-l" , settings.localPort .toString (), "-k" , config.password , "-m" , config.encryptMethod , config.udp ? "-u" : "" , config.fastOpen ? "--fast-open" : "" , config.noDelay ? "--no-delay" : "" , config.plugin ? "--plugin" : "" , config.plugin ?? "" , config.pluginOpts ? "--plugin-opts" : "" , config.pluginOpts ?? "" , settings.verbose ? "-v" : "" , "-t" , (config.timeout ?? "60" ).toString () ]; return new Promise ((resolve ) => { console .log (`check port ${settings.localPort} usage...` ); ssLocal = spawn ( sslocalPath, args.filter (arg =>'' ) ); ssLocal.stdout ?.once ("data" , async () => { logger.info ("Started ss-local" ); logger.info ("Set proxy on" ); ... connected = true ; mainWindow?.webContents .send ("connected" , true ); resolve ({ code : 200 , result : null }); }); ssLocal.stdout ?.on ("data" , data => logger.info (data); }); ssLocal.on ("error" , err => logger.error (err); }); ssLocal.on ("exit" , async (code, signal) => { logger.info (`Exited ss-local with code ${code} or signal ${signal} ` ); logger.info ("Set proxy off" ); ... connected = false ; MessageChannel .sendTo (mainWindow?.id || 1 , 'connected' , false ); ssLocal = null ; }); }); ... };
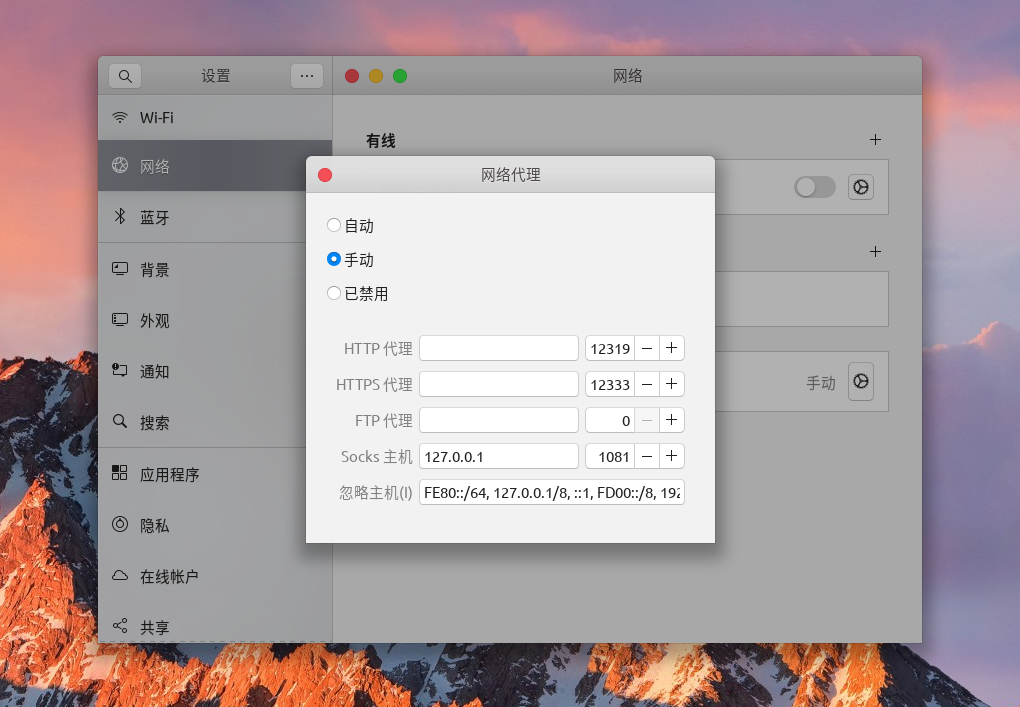
6. 多平台功能适配之设置系统 proxy 和 pac 服务 客户端中可以切换全局 proxy 和 pac 模式 ,全局即系统上运行的应用程序都走 proxy 流量。而 pac 则是一种更加智能化的模式,通过配置 pac 文件的地址(http / fs 协议),实现系统流量按照 pac 中声明的规则进行智能化分流处理,只将我们不能直接访问的域名通过 proxy 转发。
如果你正在使用 Ubuntu 操作系统的话可以依次打开:设置 - 网络 - 网络DaiLi(拼音手动和谐),里面可以选择:自动 / 手动 / 禁用 三种模式,其中自动 即为 pac 模式,我们可以填入在线或本地pac文件的地址,例如:http://localhost:1090/proxy.pac,然后系统就会智能化分配流量了;手动 就是全局 proxy,里面可以配置各种 proxy 的地址(http / https / socks / ftp),如:socks5://127.0.0.1:1080;禁用 不用多说就是禁止系统 proxy,直接根据访问目标走 dns 系统查询到的 IP 地址。
如果你正在使用 Mac 操作系统的话其实也大同小异,可以从:系统偏好设置 - 网络 - 高级 - DaiLi(拼音手动和谐) 处找到相关设置。 客户端实现的功能就是避免用户进行上述的繁琐的设置操作,在界面通过功能按钮一键切换即可。
设置系统 proxy 客户端适配了Ubuntu 操作系统中最常用的 Gnome 桌面版本,原理是使用其自带的 gsetting 命令直接在命令行设置 proxy:
1 2 3 4 5 6 7 8 9 10 11 12 13 14 15 16 17 18 19 20 21 22 23 24 export const setGlobalProxy = async (host: string , port: number ) => { const manualSet = await execAsync ( "gsettings set org.gnome.system.proxy mode manual" ); const hostSet = await execAsync ( `gsettings set org.gnome.system.proxy.socks host '${host} '` ); const portSet = await execAsync ( `gsettings set org.gnome.system.proxy.socks port ${port} ` ); const bypassSet = await execAsync ( `gsettings set org.gnome.system.proxy ignore-hosts "['${ignoredHosts} ']"` ); return ( manualSet.code === 0 && hostSet.code === 0 && portSet.code === 0 && bypassSet.code === 0 ); };
而对于 Mac 操作系统也有类似的操作命令 networksetup:
1 2 3 4 5 6 7 8 9 10 11 12 13 14 15 16 17 18 19 20 21 22 23 24 25 26 export const setGlobalProxy = async (host: string , port: number ) => { const services = await listNetworkServices (); if (!services) { return false ; } const results = await Promise .all ( services.map (async service => { const autoSet = await execAsync ( `networksetup -setsocksfirewallproxystate '${service} ' on` ); const urlSet = await execAsync ( `networksetup -setsocksfirewallproxy '${service} ' '${host} ' ${port} ` ); const bypassSet = await execAsync ( `networksetup -setproxybypassdomains '${service} ' '${ignoredHosts} '` ); return autoSet.code === 0 && urlSet.code === 0 && bypassSet.code === 0 ; }) ); return results.filter (i =>true ).length > 0 ; };
设置系统 pac 文件地址 原理都相同,都是使用命令生成 pac 文件,然后启动一个 http 服务器做静态托管,最后通过操作系统内置命令将 pac 文件地址设置好即可。
在 Ubuntu 系统中:
1 2 3 4 5 6 7 8 9 10 11 export const setPacProxy = async (url: string ) => { const autoSet = await execAsync ( "gsettings set org.gnome.system.proxy mode auto" ); const urlSet = await execAsync ( `gsettings set org.gnome.system.proxy autoconfig-url '${url} '` ); return autoSet.code === 0 && urlSet.code === 0 ; };
在 Mac 系统中:
1 2 3 4 5 6 7 8 9 10 11 12 13 14 15 16 17 18 19 20 21 22 23 24 25 26 27 28 29 30 31 32 33 34 const listNetworkServices = async ( const result = await execAsync ("networksetup -listallnetworkservices" ); if (result.code === 0 && result.stdout ) { const r = result.stdout .split ("\n" ); r.shift (); return r; } else { return null ; } }; export const setPacProxy = async (url: string ) => { const services = await listNetworkServices (); if (!services) { return false ; } const results = await Promise .all ( services.map (async service => { const autoSet = await execAsync ( `networksetup -setautoproxystate '${service} ' on` ); const urlSet = await execAsync ( `networksetup -setautoproxyurl '${service} ' '${url} '` ); return autoSet.code === 0 && urlSet.code === 0 ; }) ); return results.filter (i =>true ).length > 0 ; };
7. 多平台功能适配之应用开机自启动 原作者仅支持了 Mac 系统的开机自启,使用了 Electron 自带的平台专用 API - setLoginItemSettings,不过 API 仅支持 Mac:
1 2 3 4 5 6 7 import { app } from 'electron' ;... app.setLoginItemSettings ({ openAtLogin : params.openAtLogin , openAsHidden : params.openAsHidden });
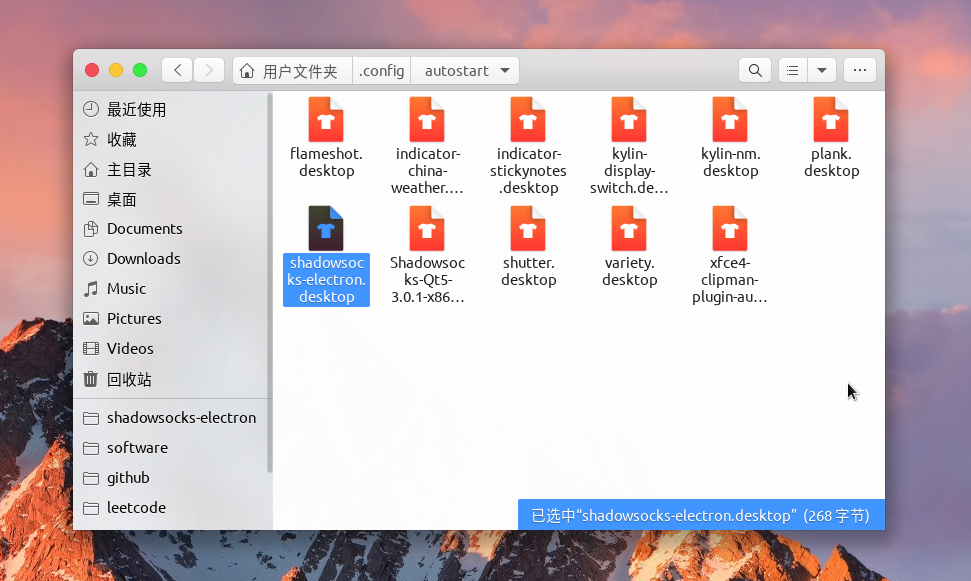
Ubuntu 我还是用的比较熟悉的,毕业后一直用于工作和日常使用。加上之前也做过一个 Ubuntu 版本的类似电脑管家的小桌面应用 ,因此对 Gnome 桌面和 Electron 方面的交互有一定经验。Ubuntu 上面要想实现应用开机自启需要自己定制一个配置文件到 ~/.config/autostart/ 路径下,比如 ~/.config/autostart/shasowsocks-electron.desktop:
1 2 3 4 5 6 7 8 9 10 11 [Desktop Entry] Name=Shadowsocks Electron Exec=shadowsocks-electron Terminal=false Type=Application Icon=shadowsocks-electron StartupWMClass=Shadowsocks Electron Encoding=UTF-8 Comment=Shadowsocks GUI with cross-platform desktop support Categories=Network Hidden=false
需要重点关注的是以下字段:
Exec:应用可执行文件路径或命令 Type:GUI应用应填写 Application Hidden:禁用/启用状态 在客户端中当用户开启了开机自启功能时,Node.js 就检查相应目录是否存在这个文件,不存在的话先使用 fs.write API 创建文件,并根据具体的开启/禁用状态更改 Hidden 字段即可:
1 2 3 4 5 6 7 8 9 10 11 12 13 14 15 16 17 18 19 20 21 22 23 24 25 26 27 28 export const setStartupOnBoot_linux = (on: boolean ) => { const startupDir = `${os.homedir()} /.config/autostart` ; const startupFile = 'shadowsocks-electron.desktop' ; const fileContent = [ "[Desktop Entry]" , "Name=Shadowsocks Electron" , "Exec=shadowsocks-electron" , "Terminal=false" , "Type=Application" , "Icon=shadowsocks-electron" , "StartupWMClass=Shadowsocks Electron" , "Encoding=UTF-8" , "Comment=Shadowsocks GUI with cross-platform desktop support" , "Categories=Network" ]; return new Promise ((resolve, reject ) => { fs.writeFile ( path.join (startupDir, startupFile), `${fileContent.join(os.EOL)} ${os.EOL} Hidden=${on ? false : true } ` , (err => if (err) reject (err); resolve (path.join (startupDir, startupFile)); }) ); }); }
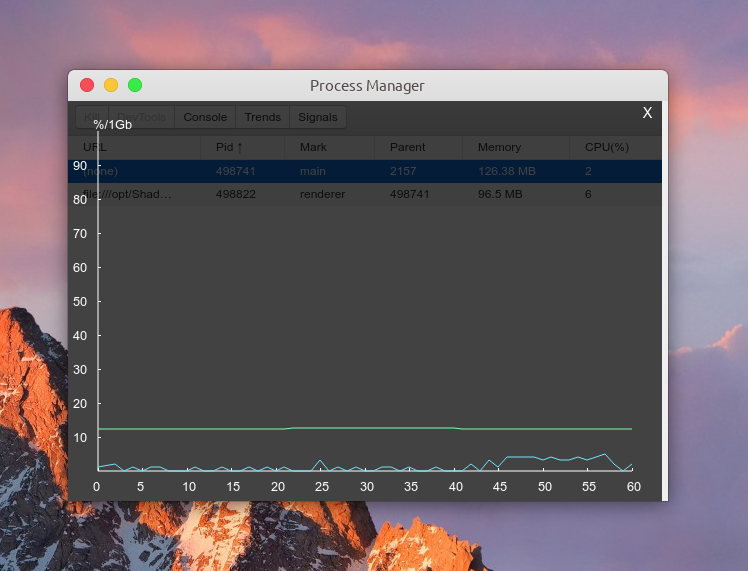
8. 使用 Electron 进程管理器提高开发调试效率 上文在描述 redux-persist 数据持久化功能时提到过,Electron 框架最近的几个版本带来了一个破坏性修改,remote 远程调用被强制移除了。这样子 npm 上大量的依赖 remote API 的开源工具就会出现兼容性问题,除非开源作者将 electron.remote 更改为 @electron/remote 第三方外部包。
不过总有一些开源仓库不会被开源作者和社区一直维护,我之前在开发阶段一直用的调试工具 devtron 就是这个情况。工具可以在 devtools 控制台中开启一个面板查看 electron 的 ipc 通信记录,因为 Electron 本地应用不存在 http 请求,因此不会在网络请求面板中看到,所以需要这样一个工具查看主进程和渲染进程之间的消息记录以便追踪应用。
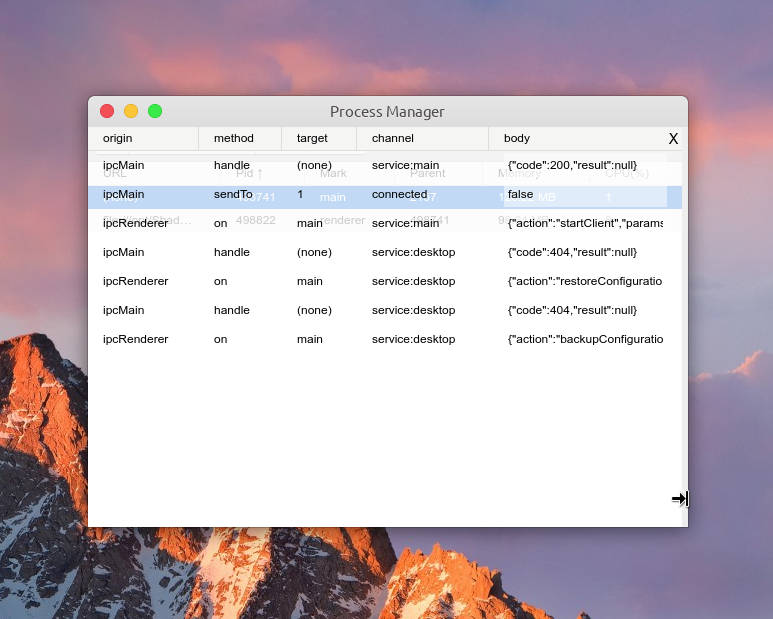
devtron github 主页贴着项目不再维护,寻求热心的开源开发者继续维护的消息。devtron 最近的一次版本在我使用的 electron@13.4.0 上也直接歇菜了🤪。我遇到 devtron 报错打不开的情况后索性突发奇想将所有原生的 ipc 通信方式(on / once / send / sendTo / invoke / handle…) 使用我自己之前开发的进程管理工具 electron-re 替代,感兴趣的可以看看 github 仓库 。迁移到 electron-re 之后,我在项目中开了一个 dev 分支专门用于支持ipc 通信记录功能,其实适配工作量不大,写个UI界面,然后在原有的数据采集模块新增一点逻辑即可。
这里顺便打个广告🤏,electron-re 主要是作为一个进程管理器和 ipc 通信工具开发的,除了支持 Electron 应用中主进程、渲染进程、service 进程(electron-re 引入)、child 进程(electron-re 引入) 的资源占用情况动态统计功能,也提供了一个 ipc 通信工具 MessageChannel,它基于 electron 原生 ipc 通信开发。除此之外它还提供了一个简单实现的进程池工具 ChildProcessPool 和与之配套使用的 ProcessHost 消息工具。这次针对 shadowsocks-electron 和其他 Electron 应用开发的 ipc 通信记录面板功能就是在 MessageChannel 通信工具中通过新增通信记录上报逻辑来实现的。
Others 开发过程中的其它提及
1. Mac 虚拟机真是难装
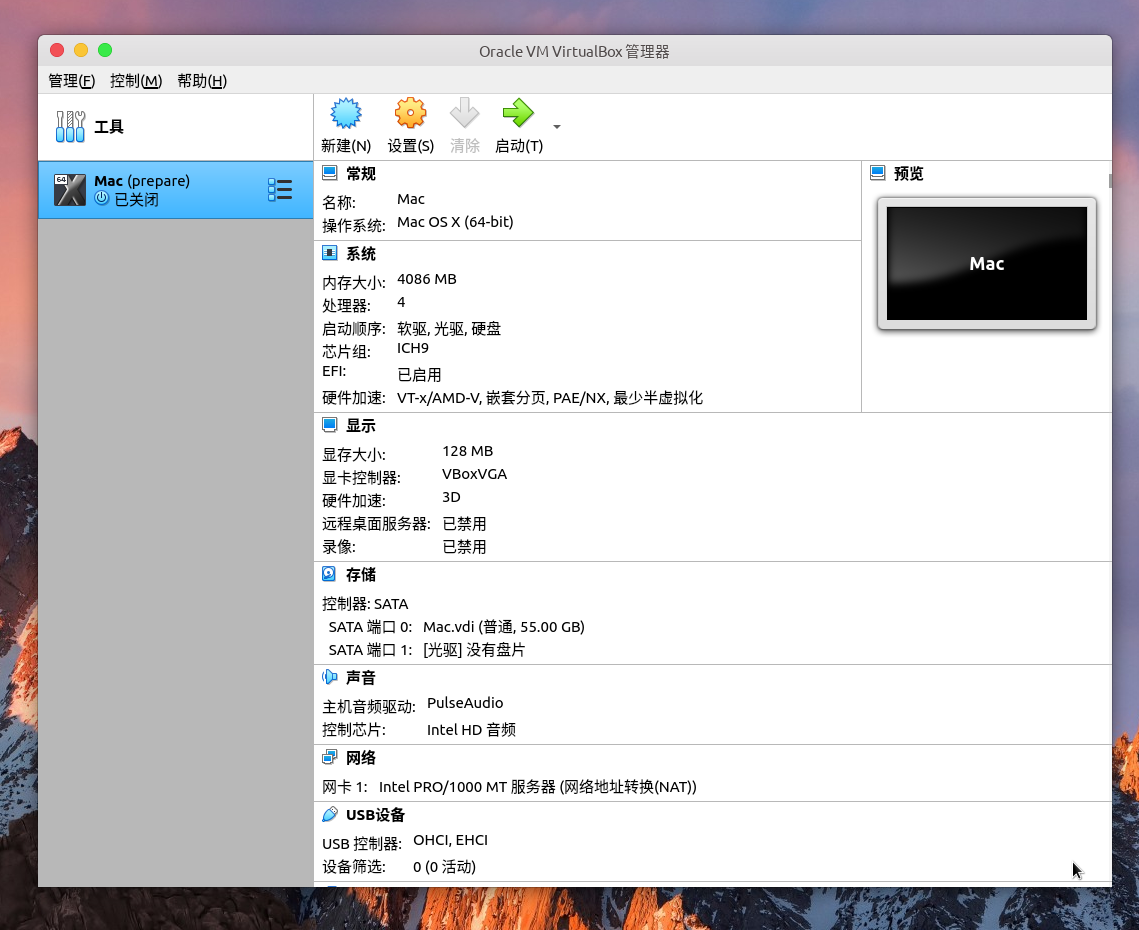
安装 Mac 虚拟机足足折磨了我一天多,实体机安装 Ubuntu 双系统 40 分钟就能解决的事儿,从下载 virtualbox 可用的 MacOS 10.15 开始,龟速百度网盘。安装 ISO 时很容易卡住或者报错,最后查了很多资料整理出以下步骤:
一台支持英特尔虚拟化技术的电脑 + MacOS 10.15 镜像 (密码:3guu)
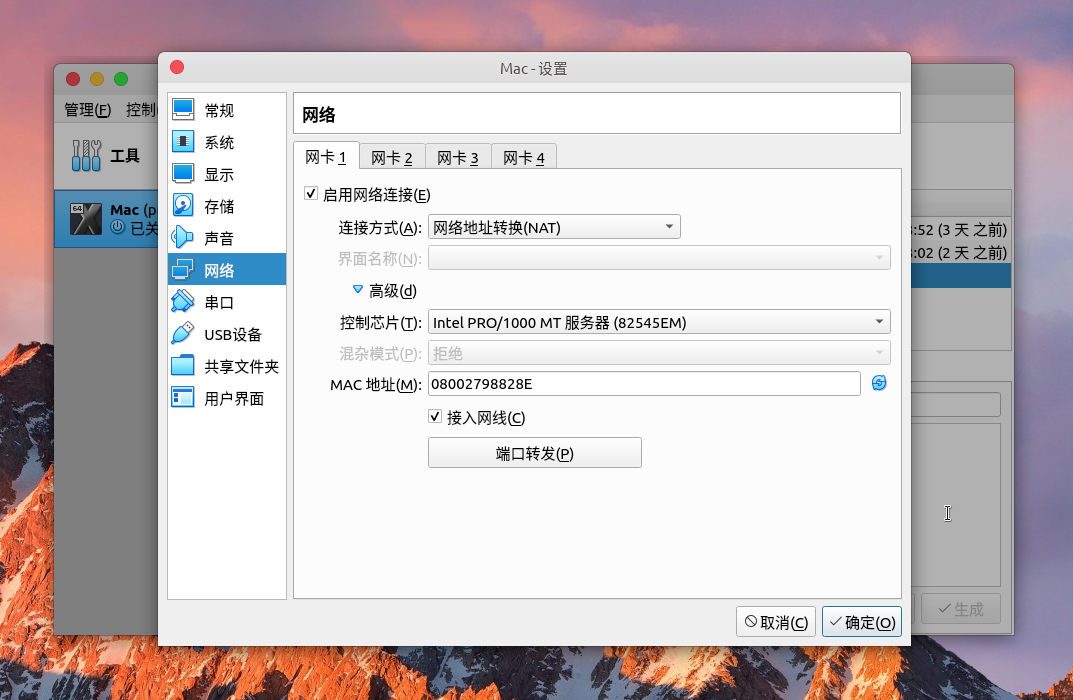
1)VirtualBox虚拟机软件,版本号在 6.0 及以上即可。 2)启动虚拟机创建向导,选择类型 - Mac OS X,版本 -Mac OS x64。 3)其余什么内存、磁盘之类的按照自己需求大概配置一下,格外注意的是网络不要选择桥接网卡,选中默认的NAT网络模式,否则 Ubuntu20.04 操作系统下可能会在运行虚拟机的时候卡死宿主机。NAT 模式不能分配和宿主机同网段的独立 IP,因此如果要通过 SSH 访问虚拟机的话可以在虚拟机设置里面开启端口转发,比如我将宿主机端口 2222 映射到虚拟机内部 ssh 的默认端口 22,这样就可以在宿主机通过命令:ssh -p 2222 nojsja@127.0.0.1 来连接了。
4)虚拟机创建好后注意在虚拟机设置中存储页面添加下载好的 ISO 光盘镜像作为开机引导。 5)以上步骤准备好后,有一个比较关键的操作,设置虚拟机相关配置,不然安装很可能出错: 1 2 3 4 5 6 7 8 $: VBoxManage modifyvm "macOS" --cpuidset 00000001 000106e5 00100800 0098e3fd bfebfbff $: VBoxManage setextradata "macOS" "VBoxInternal/Devices/efi/0/Config/DmiSystemProduct" "iMac11,3" $: VBoxManage setextradata "macOS" "VBoxInternal/Devices/efi/0/Config/DmiSystemVersion" "1.0" $: VBoxManage setextradata "macOS" "VBoxInternal/Devices/efi/0/Config/DmiBoardProduct" "Iloveapple" $: VBoxManage setextradata "macOS" "VBoxInternal/Devices/smc/0/Config/DeviceKey" "ourhardworkbythesewordsguardedpleasedontsteal(c)AppleComputerInc" $: VBoxManage setextradata "macOS" "VBoxInternal/Devices/smc/0/Config/GetKeyFromRealSMC" 1 $: VBoxManage modifyvm "macOS" --cpu-profile "Intel Core i7-6700K"
6)之后就比较常规了,开启虚拟机后,在“macOS Utilities”窗口的列表中,双击“Disk Utility”项,来启动磁盘助理,对磁盘进行分区。将需要使用的虚拟安装硬盘格式化为 “Mac OS Extended(Journaled)”或“APFS”即可。 7)其余流程跟着引导走即可,最后安装完了重启之后,别忘了在虚拟机存储里卸载 ISO 引导光盘,否则会开机一直进入安装界面。 2. Mac brew 在国内环境的安装方式 Mac 安装好后,需要使用 brew 包管理器安装 shadowsocks-libev,官方提供的脚本在国内网络环境下会安装失败,建议使用国内开发者编写的版本:
官方脚本:/bin/bash -c "$(curl -fsSL https://raw.githubusercontent.com/Homebrew/install/HEAD/install.sh)"
国内开发者编写的脚本:/bin/zsh -c "$(curl -fsSL https://gitee.com/cunkai/HomebrewCN/raw/master/Homebrew.sh)"
3. Node.js child_process 执行二进制文件的一些坑 客户端中 MacOS 平台需要执行 shadowsocks-libev 库中提供的命令连接服务器如:sslocal -s host -p port -l localPort -k password -m method ...,上文中提到针对 MacOS 的兼容方式是在构建包中提供 ss-local 二进制文件,以避免让用户手动执行 brew install shadowsocks-libev 来安装依赖库。
这里有个坑就是开发者为用户提供 ss-local 后,默认这个二进制文件是放在应用安装目录的,但是你不知道用户操作系统中你的客户端软件会被具体安装到哪里,极可能是系统相关目录。系统相关目录中的文件 Electron 默认是不能执行的,也不能通过 Node.js 提供的 fs.chmod 方式手动为可执行文件授予执行权限。
这个问题之前开发 Ubuntu 桌面管家的时候遇到过,都是 Unix 系的操作系统,Mac 这边也会出现这个问题。解决方案就是将客户端需要用到的 bin 二进制文件在应用启动的时候拷贝到用户数据目录,这个目录下的文件用户拥有完全控制权,可以使用 Node.js 提供的 fs.chmod API让二进制文件可执行。具体实现如下:
1 2 3 4 5 6 7 8 9 10 11 12 13 14 15 16 17 18 19 20 21 22 23 24 25 26 27 28 29 30 31 32 33 34 35 36 37 38 39 40 41 42 43 44 45 46 47 48 49 50 51 52 53 54 55 56 57 58 59 60 61 62 63 64 65 66 67 68 69 70 71 72 73 74 75 76 77 78 79 80 81 82 83 84 85 86 87 88 89 90 91 92 93 94 export const checkEnvFiles = (args : {_path : string , isDir : boolean , exec?: () => void }[]): void => const check = function (params: {_path: string , isDir: boolean , exec?: () => void } ) { if (!fs.existsSync (params._path )) { if (params.isDir ) { fs.mkdirSync (params._path ); params.exec && params.exec (); } else { fs.closeSync (fs.openSync (params._path , 'w' )); } } }; args.forEach (check); }; export const copyDir = (src: string , dist: string , callback?: (params: any ) => void ) => { let paths, stat; if (!fs.existsSync (dist)) { fs.mkdirSync (dist); } _copy (src, dist); function _copy (src: string , dist: string ) { paths = fs.readdirSync (src); paths.forEach (function (_path ) { let _src = path.join (src, _path); let _dist = path.join (dist, _path); stat = fs.statSync (_src); if (stat.isFile ()) { fs.writeFileSync (_dist, fs.readFileSync (_src)); } else if (stat.isDirectory ()) { copyDir (_src, _dist, callback) } }) } } const chmod = (target: string , opstr: number ) => { if (fs.statSync (target).isDirectory ()) { const files = fs.readdirSync (target); if (files.length ) { files.forEach ((file ) => { fs.chmod (path.join (target, file), opstr); }); } } else { if (target && !target.includes ('.gitignore' )) { console .log (`fs.chmod => ${target} with ${opstr} ` ); fs.chmodSync (target, opstr); } } } const appDataPath = path.join (app.getPath ('appData' ), packageName);const pathRuntime = (global as any ).pathRuntime = path.join (appDataPath, 'runtime/' );checkEnvFiles ( [ { _path : appDataPath, isDir : true }, { _path : pathRuntime, isDir : true }, { _path : path.join (pathRuntime, 'bin' ), isDir : true , exec : () => { copyDir (path.join (app.getAppPath (), 'bin' ), path.join (pathRuntime, 'bin' )); } } ] ); chmod (path.join (pathRuntime, 'bin' ), 0o711 );
4. 怎样为未适配 Typescript 的第三方包编写 @types 声明 上文提到引入了 electron-re 进程管理工具用于 ipc 消息追踪,不过之前开发 electron-re 时并未适配 Typescript 环境,仍然是 commonJs 规范,不过 TS 里引入第三方包只要存在类型声明文件即可。方法一是编写 @types/electron-re 单独发包支持,另一种就是直接在 electron-re 项目下声明即可,自己的仓库可以选择第二种。
在项目根目录中创建声明文件 types/index.d.ts:
1 2 3 4 5 6 7 8 9 10 11 12 13 14 15 16 17 18 19 20 21 22 23 24 25 26 27 28 29 30 31 32 33 34 35 36 37 38 39 40 41 42 43 44 45 46 declare module electronReModule { export interface electronRe { MessageChannel : { invoke : (name: string , channel: string , args: unknown ) => Promise <any > handle : (channel: string , promiseFunc: (event, args: { action: string , params: any }) => Promise <unknown > ) => void send : (name: string , channel: string , args: unknown ) => void sendTo : (id: number , channel: string , args: unknown ) => void on : (channel: string , func: () => void ) => void once : (channel: string , func: () => void ) => void registry : (name: string , id: number , pid: number ) => void } BrowserService : { openDevTools : () => void connected : (callback?: () => void ) => void } ChildProcessPool : { send : (taskName: string , params: unknown , givenId: number ) => Promise <any > sendToAll : (taskName: string , params: unknown ) => void kill : (id?: number ) => void setMaxInstanceLimit : (count: number ) => void } ProcessHost : { registry : (taskName: string , processor: () => Promise <any > ) => void unregistry : (taskName: string ) => void disconnect : () => void exit : () => void } ProcessManager : { pipe : (pinstance: any ) => void listen : (pids: number [], mark: string , url?: string ) => void unlisten : (pids: number [] ) => void openDevTools : (pid: number ) => void killProcess : (pid: number ) => void setIntervalTime : (time: number ) => void openWindow : (env: 'prod' | 'dev' | void ) => void } } } declare const ere : electronReModule.electronRe ;export = ere;
然后在 package.json 中声明相关字段引入 types 文件:
1 2 3 4 5 { ... "types" : "./types/index.d.ts" ... }
注意:commonJs 规范和 ES module 规范的包声明写法略有不同,这里再给出一个 ES module 规范声明文件示例(与 electron-re 无关):
1 2 3 4 5 6 7 8 9 10 11 12 13 14 15 16 17 18 19 20 21 22 23 24 25 26 27 28 29 30 31 32 33 34 35 36 37 38 39 40 41 42 43 import React from 'react' ;interface ReturnTreeData { depth : number id : boolean isInEdit : boolean key : string nameEditable : boolean nodeDeletable : boolean nodeName : string nodeValue : ReturnTreeData [] valueEditable : boolean } interface TreeStateTypes { treeData : ReturnTreeData []; expandedKeys : string []; enableYaml : boolean ; maxLevel : number ; lang : 'zh_CN' | 'en_US' ; } interface TreePropsDataTypes { nodeName : string ; id : string ; nameEditable ?: boolean ; valueEditable ?: boolean ; nodeDeletable ?: boolean ; nodeValue : TreePropsDataTypes [] | string ; } interface TreePropsTypes { data : TreePropsDataTypes []; maxLevel : number ; enableYaml : boolean ; lang : 'en_US' | 'zh_CN' ; onDataChange : (params: ReturnTreeData[] ) => void }; declare module 'editable-tree-antd' { export default class EditableTree extends React.Component <TreePropsTypes , TreeStateTypes > {} }
5. 感谢作为 UI 设计师的 GF 倾情支持 shadowsocks-electron 客户端的图标是 GF 工作之余帮忙处理的,好看的渐变色小飞机图标!
6. 延伸阅读 Final 结语
这是完整做过的第四个 Electron 项目了,第一个是 Ubuntu 电脑管家,第二个是公司项目:一个类似百度网盘采用 SMB 协议支持的文件管理器,第三个是 electron-re 进程管理工具,最后一个就是这次的 shadowsocks-electron 跨平台 proxy 工具了。
客户端目前已经发布了 v1.0.0 版本,支持 Mac 和 Ubuntu x64 平台,主要测试环境是:Ubuntu20.04 amd64 和 MacOS catalina x64 。
后期会持续支持,喜欢的话可以去 github 仓库 star ⭐ !
近期有这些想完善的功能:
考虑支持 HTTP Proxy。 考虑支持 SSR 服务器连接。 修复二维码导入功能中遮罩层窗口内部二维码高亮区域位置不准确的问题(由系统状态栏导致),并适配多屏幕。 很想支持服务器延迟检测和连接速度测试功能,感觉会很炫。 v2ray 的话其实已经以插件的形式支持了,不过目前没有详细测试过这一功能,考虑如有必要后面会直接支持解析 v2ray 加密链接。暂时只考虑为 Mac/Ubuntu 适配,Win 平台的话工具很多,Shadowsocks 官方也有一直在维护的客户端,用起来都很舒服。
总之学到了新东西,最折磨人的地方其实是折腾 Mac 虚拟机,踩了很多坑,以后我还是继续用我的 Ubuntu/Win 双系统吧 ~ 😂


