>> 原文链接
文中实现的部分工具方法正处于早期/测试阶段,仍在持续优化中,仅供参考…
在 Ubuntu20.04 上进行开发/测试,可用于 Electron 项目,测试版本:Electron@8.2.0 / 9.3.5
Contents 1 2 3 4 5 6 7 8 9 10 11 12 13 14 15 16 17 18 19 20 21 22 23 24 25 26 27 28 29 30 31 32 33 34 35 36 37 38 39 ├── Contents (you are here!) │ ├── I. 前言 ├── II. 架构图 │ ├── III.electron-re 可以用来做什么? │ ├── 1) 用于 Electron 应用 │ └── 2) 用于 Electron/Nodejs 应用 │ ├── IV. UI 功能介绍 │ ├── 主界面 │ ├── 功能1:Kill 进程 │ ├── 功能2:一键开启 DevTools │ ├── 功能3:查看进程日志 │ ├── 功能4:查看进程 CPU/Memory 占用趋势 │ └── 功能5:查看 MessageChannel 请求发送日志 │ ├── V. 新特性:进程池负载均衡 │ ├── 关于负载均衡 │ ├── 负载均衡策略说明 │ ├── 负载均衡策略的简易实现 │ ├── 负载均衡器的实现 │ └── 进程池配合 LoadBalancer 来实现负载均衡 │ ├── VI. 新特性:子进程智能启停 │ ├── 使进程休眠的各种方式 │ ├── 生命周期 LifeCycle 的实现 │ └── 进程互斥锁的雏形 │ ├── VII. 存在的已知问题 ├── VIII. Next To Do │ ├── IX. 几个实际使用示例 │ ├── 1) Service/MessageChannel 使用示例 │ ├── 2) 一个实际用于生产项目的例子 │ ├── 3) ChildProcessPool/ProcessHost 使用示例 │ ├── 3) test 测试目录示例 │ └── 4) github README 说明 │
I. 前言 之前在做 Electron 应用开发的时候,写了个 Electron 进程管理工具 electron-re ,支持 Electron/Node 多进程管理、service 模拟、进程实时监控(UI功能)、Node.js 进程池等特性。已经发布为npm组件,可以直接安装(最新特性还没发布到线上,需要再进行测试):
>> github地址
1 2 3 $: npm install electron-re --save $: yarn add electron-re
本主题前面两篇文章:
《Electron/Node多进程工具开发日记》 描述了electron-re的开发背景、针对的问题场景以及详细的使用方法。《Electron多进程工具开发日记2》 介绍了新特性 “多进程管理 UI” 的开发和使用相关。UI 界面基于 electron-re 已有的 BrowserService/MessageChannel 和 ChildProcessPool/ProcessHost 基础架构驱动,使用 React17 / Babel7 开发。这篇文章主要是描述最近支持的进程池模块新特性 - “进程池负载均衡” 和 “子进程智能启停”,以及相关的基本实现原理。同时提出自己遇到的一些问题,以及对这些问题的思考、解决方案,对之后版本迭代的一些想法等等。
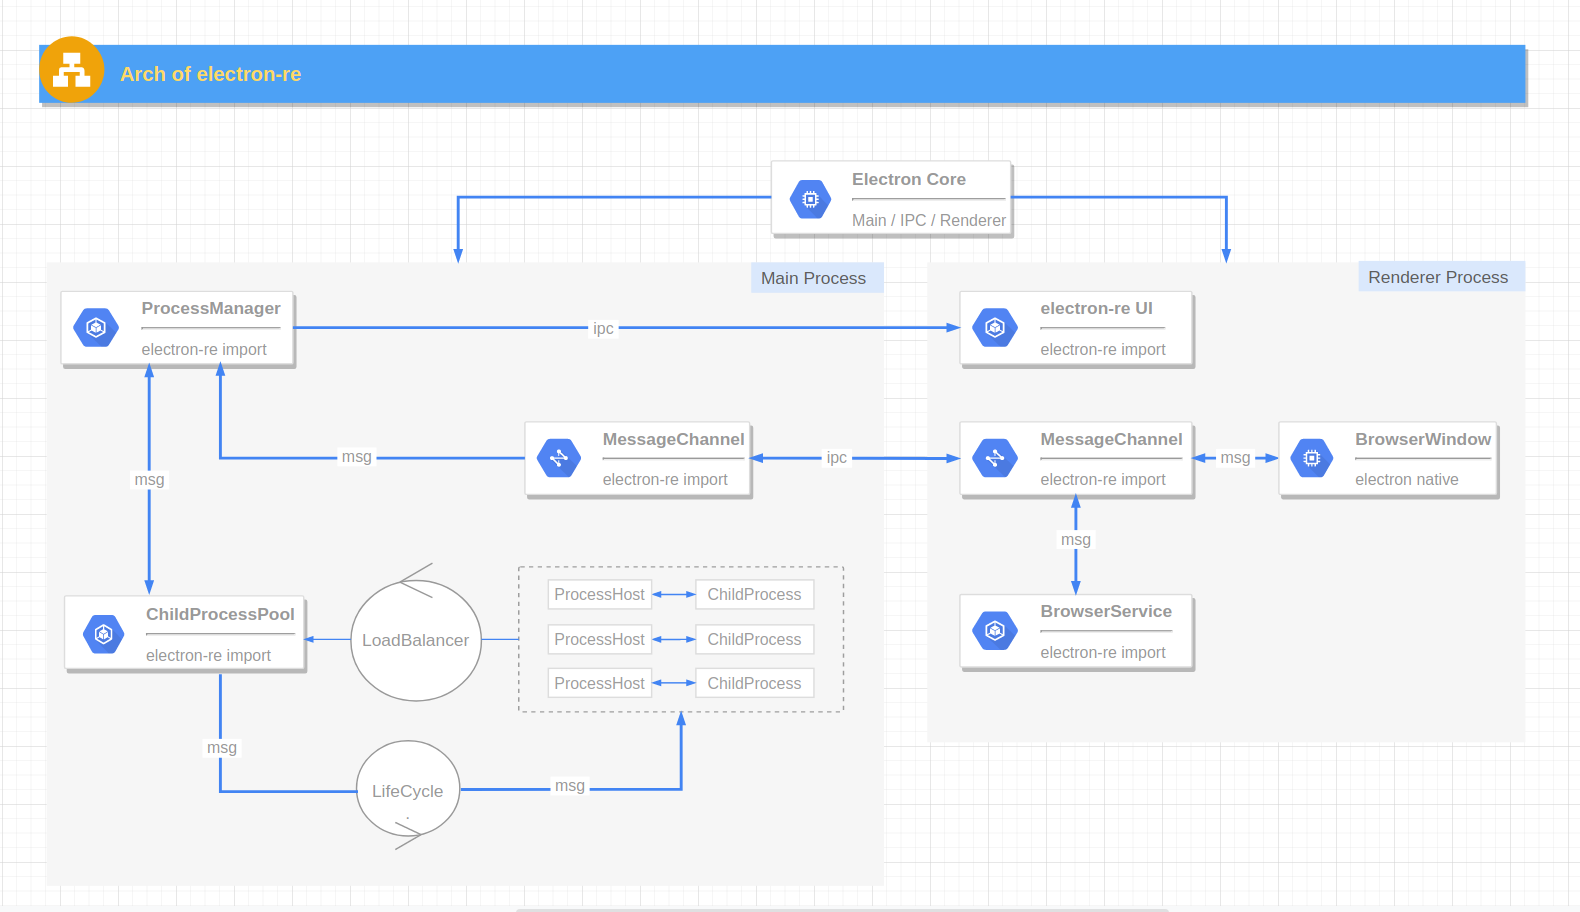
II. electron-re 架构图
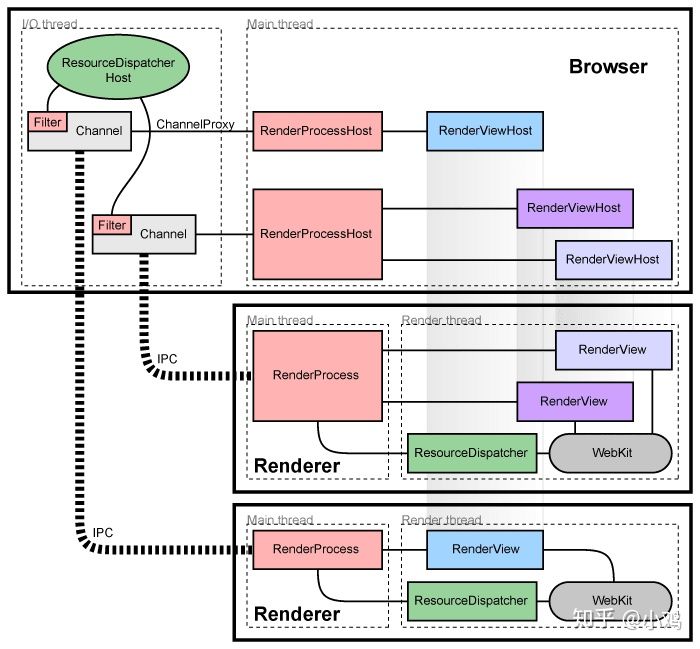
Electron Core :Electron 应用的一系列核心功能,包含了应用的主进程、渲染进程、窗口等等(Electron 自带)。BrowserWindow :渲染窗口进程,一般用于UI渲染 (Electron 自带)。ProcessManager :进程管理器,负责进程占用资源采集、异步刷新UI、响应和发出各种进程管理信号,作为一个观察者对象给其它模块和UI提供服务 (electron-re 引入)。MessageChannel :适用于主进程、渲染进程、Service 进程的消息发送工具,基于原生 IPC 封装,主要服务于 BrowserService,也可替代原生的 IPC 通信方法 (electron-re 引入)。ChildProcess :由 child_process.fork 方法生成的子进程,不过以装饰器的方式为其添加了简单的进程休眠和唤醒逻辑 (electron-re 引入)。ProcessHost :配合进程池使用的工具,我称它为 “进程事务中心”,封装了 process.send / process.on 基本逻辑,提供了 Promise 的调用方式让 主进程/子进程 之间 IPC 消息通信更简单 (electron-re 引入)。LoadBalancer :服务于进程池的负载均衡器 (electron-re 引入)。LifeCycle :服务于进程池的生命周期 (electron-re 引入)。ChildProcessPool :基于 Node.js - child_process.fork 方法实现的进程池,内部管理多个 ChildProcess 实例对象,支持自定义负载均衡策略、子进程智能启停、子进程异常退出后自动重启等特性 (electron-re 引入)。BrowserService :基于 BrowserWindow 实现的 Service 进程,可以看成是一个运行在后台的隐藏渲染窗口进程,允许 Node 注入,不过仅支持 CommonJs 规范 (electron-re 引入)。III. electron-re 可以用来做什么? 1. 用于 Electron 应用 BrowserServiceMessageChannel在 Electron 的一些“最佳实践”中,建议将占用cpu的代码放到渲染过程中而不是直接放在主过程中,这里先看下 chromium 的架构图:
每个渲染进程都有一个全局对象 RenderProcess,用来管理与父浏览器进程的通信,同时维护着一份全局状态。浏览器进程为每个渲染进程维护一个 RenderProcessHost 对象,用来管理浏览器状态和与渲染进程的通信。浏览器进程和渲染进程使用 Chromium 的 IPC 系统进行通信。在 chromium 中,页面渲染时,UI进程需要和 main process 不断的进行 IPC 同步,若此时 main process 忙,则 UIprocess 就会在 IPC 时阻塞。所以如果主进程持续进行消耗 CPU 时间的任务或阻塞同步 IO 的任务的话,就会在一定程度上阻塞,从而影响主进程和各个渲染进程之间的 IPC 通信,IPC 通信有延迟或是受阻,渲染进程窗口就会卡顿掉帧,严重的话甚至会卡住不动。
因此 electron-re 在 Electron 已有的 Main Process 主进程 和 Renderer Process 渲染进程逻辑的基础上独立出一个单独的 Service 概念。Service即不需要显示界面的后台进程,它不参与 UI 交互,单独为主进程或其它渲染进程提供服务,它的底层实现为一个允许 node注入 和 remote调用 的 隐藏渲染窗口进程 。
这样就可以将代码中耗费 cpu 的操作(比如文件上传中维护一个数千个上传任务的队列)编写成一个单独的js文件,然后使用 BrowserService 构造函数以这个 js 文件的地址 path 为参数构造一个 Service 实例,从而将他们从主进程中分离。如果你说那这部分耗费 cpu 的操作直接放到渲染窗口进程可以嘛?这其实取决于项目自身的架构设计,以及对进程之间数据传输性能损耗和传输时间等各方面的权衡,创建一个 Service 的简单示例:
1 2 const { BrowserService } = require ('electron-re' );const myServcie = new BrowserService ('app' , path.join (__dirname, 'path/to/app.service.js' ));
如果使用了 BrowserService 的话,要想在主进程、渲染进程、service 进程之间相互发送消息就要使用 electron-re 提供的 MessageChannel 通信工具,它的接口设计跟 Electron 内建的IPC基本一致,底层也是基于原生的 IPC 异步通信原理来实现的,简单示例如下:
1 2 3 4 const { BrowserService } = require ('electron-re' );MessageChannel .send ('app' , 'channel1' , { value : 'test1' });
2. 用于 Electron/Nodejs 应用 ChildProcessPoolProcessHost此外,如果要创建一些不依赖于 Electron 运行时的子进程(相关参考nodejs child_process),可以使用 electron-re 提供的专门为 nodejs 运行时编写的进程池 ChildProcessPool 。因为创建进程本身所需的开销很大,使用进程池来重复利用已经创建了的子进程,将多进程架构带来的性能效益最大化,简单示例如下:
1 2 3 4 5 6 7 8 9 10 11 12 13 const { ChildProcessPool , LoadBalancer } = require ('electron-re' );const pool = new ChildProcessPool ({ path : path.join (app.getAppPath (), 'app/services/child.js' ), max : 3 , strategy : LoadBalancer .ALGORITHM .WEIGHTS , weights : [1 , 2 , 3 ], }); pool .send ('sync-work' , params) .then (rsp =>console .log (rsp));
一般情况下,在我们的子进程执行文件中,为了在主进程和子进程之间同步数据,可以使用 process.send('channel', params) 和 process.on('channel', function) 的方式实现(前提是进程以以 fork 方式创建或者手动开启了 IPC 通信)。但是这样在处理业务逻辑的同时也强迫我们去关注进程之间的通信,你需要知道子进程什么时候能处理完毕,然后再使用process.send再将数据返回主进程,使用方式繁琐。
electron-re 引入了 ProcessHost 的概念,我称之为"进程事务中心"。实际使用时在子进程执行文件中只需要将各个任务函数通过 ProcessHost.registry('task-name', function) 注册成多个被监听的事务,然后配合进程池的 ChildProcessPool.send('task-name', params) 来触发子进程事务逻辑的调用即可,ChildProcessPool.send() 同时会返回一个 Promise 实例以便获取回调数据,简单示例如下:
1 2 3 4 5 6 7 8 9 10 const { ProcessHost } = require ('electron-re' );ProcessHost .registry ('sync-work' , (params ) => { return { value : 'task-value' }; }) .registry ('async-work' , (params ) => { return fetch (params.url ); });
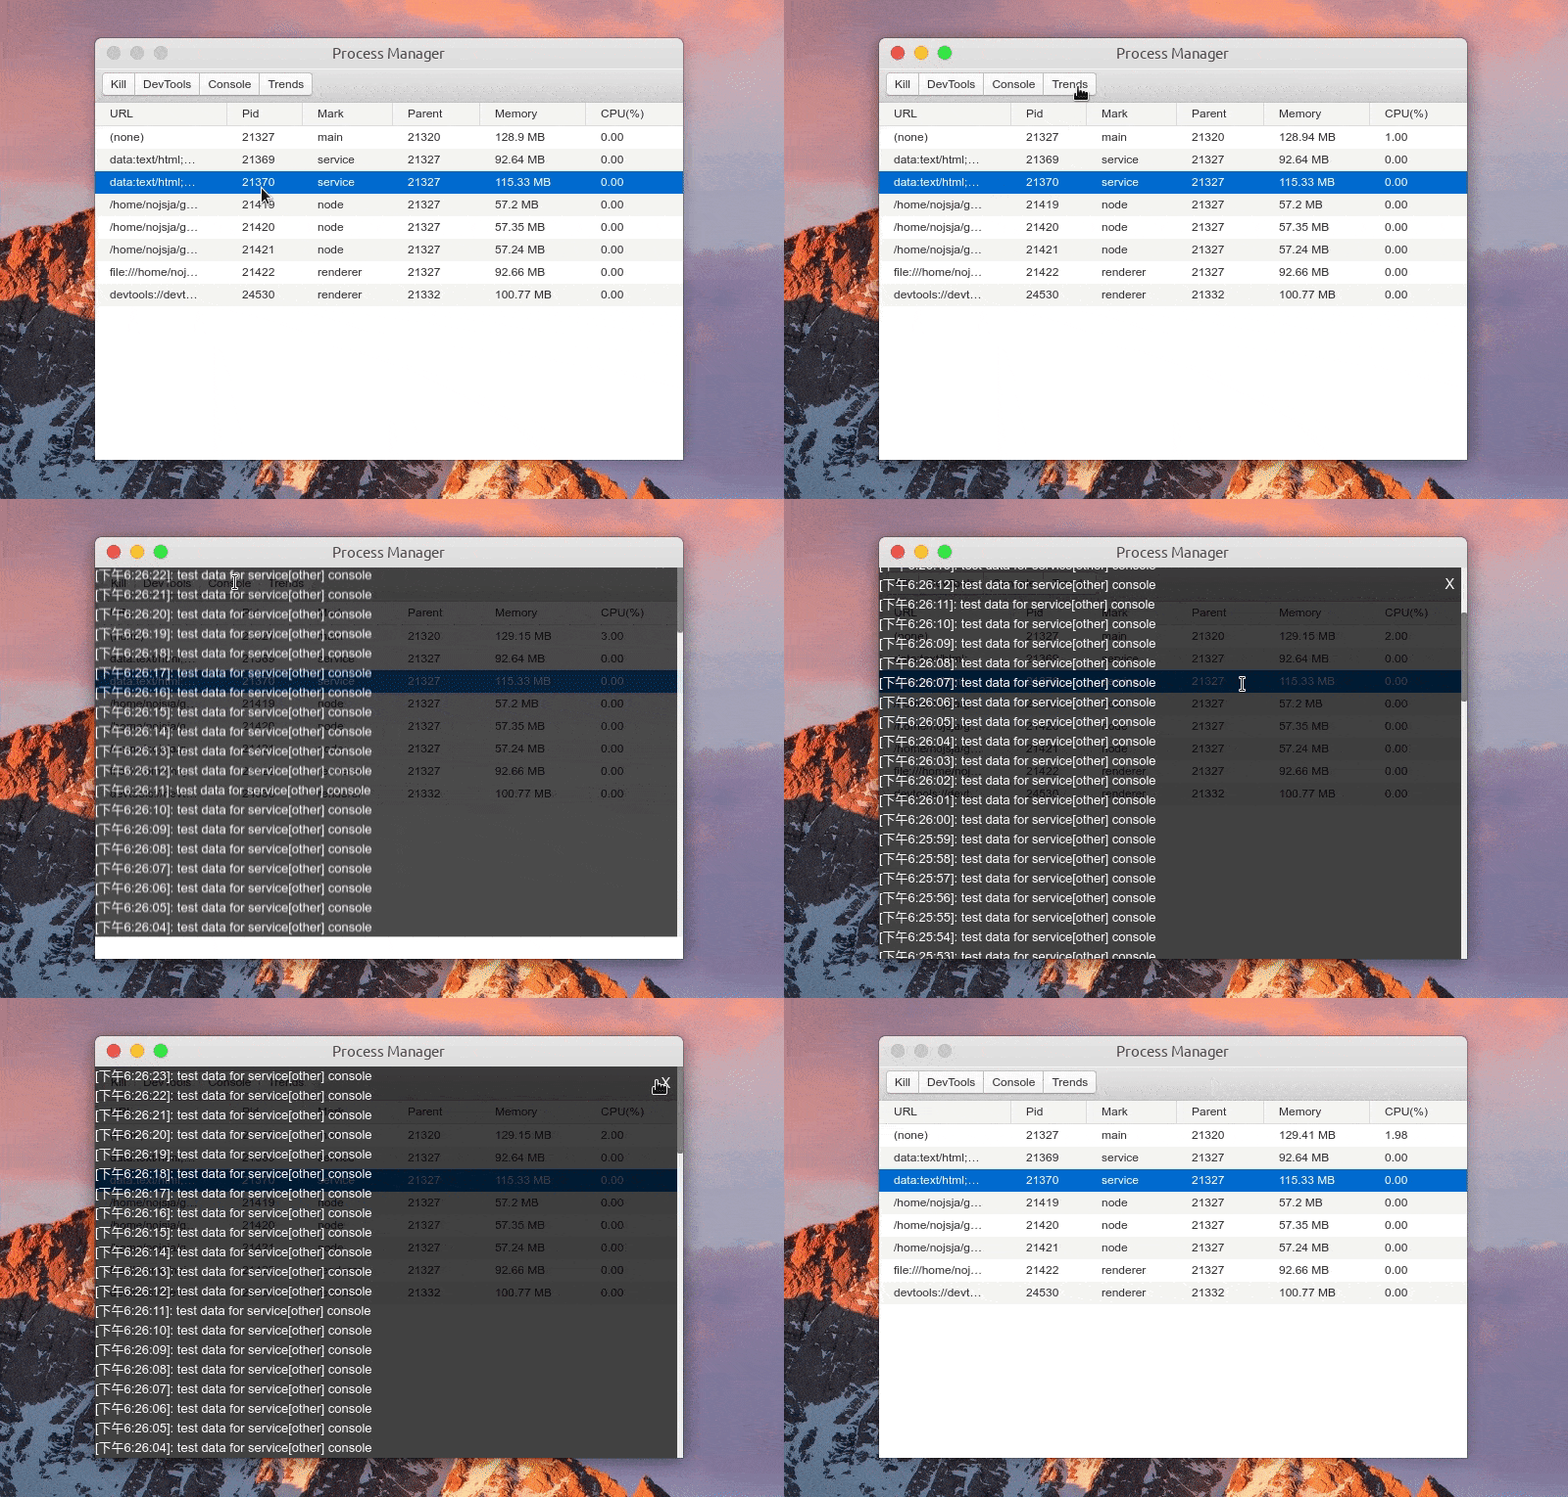
IV. UI 功能介绍 UI 功能基于 electron-re 基础架构开发,它通过异步 IPC 和主进程的 ProcessManager 进行通信,实时刷新进程状态。操作者可以通过 UI 手动 Kill 进程、查看进程 console 数据、查看进程数 CPU/Memory 占用趋势以及查看 MessageChannel 工具的请求发送记录。
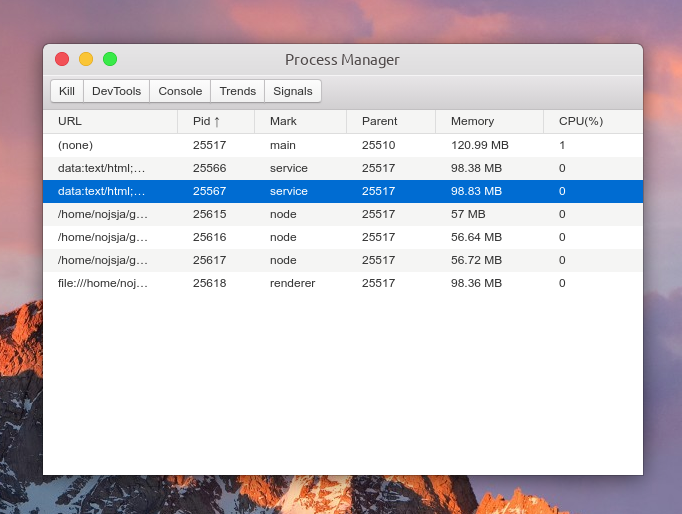
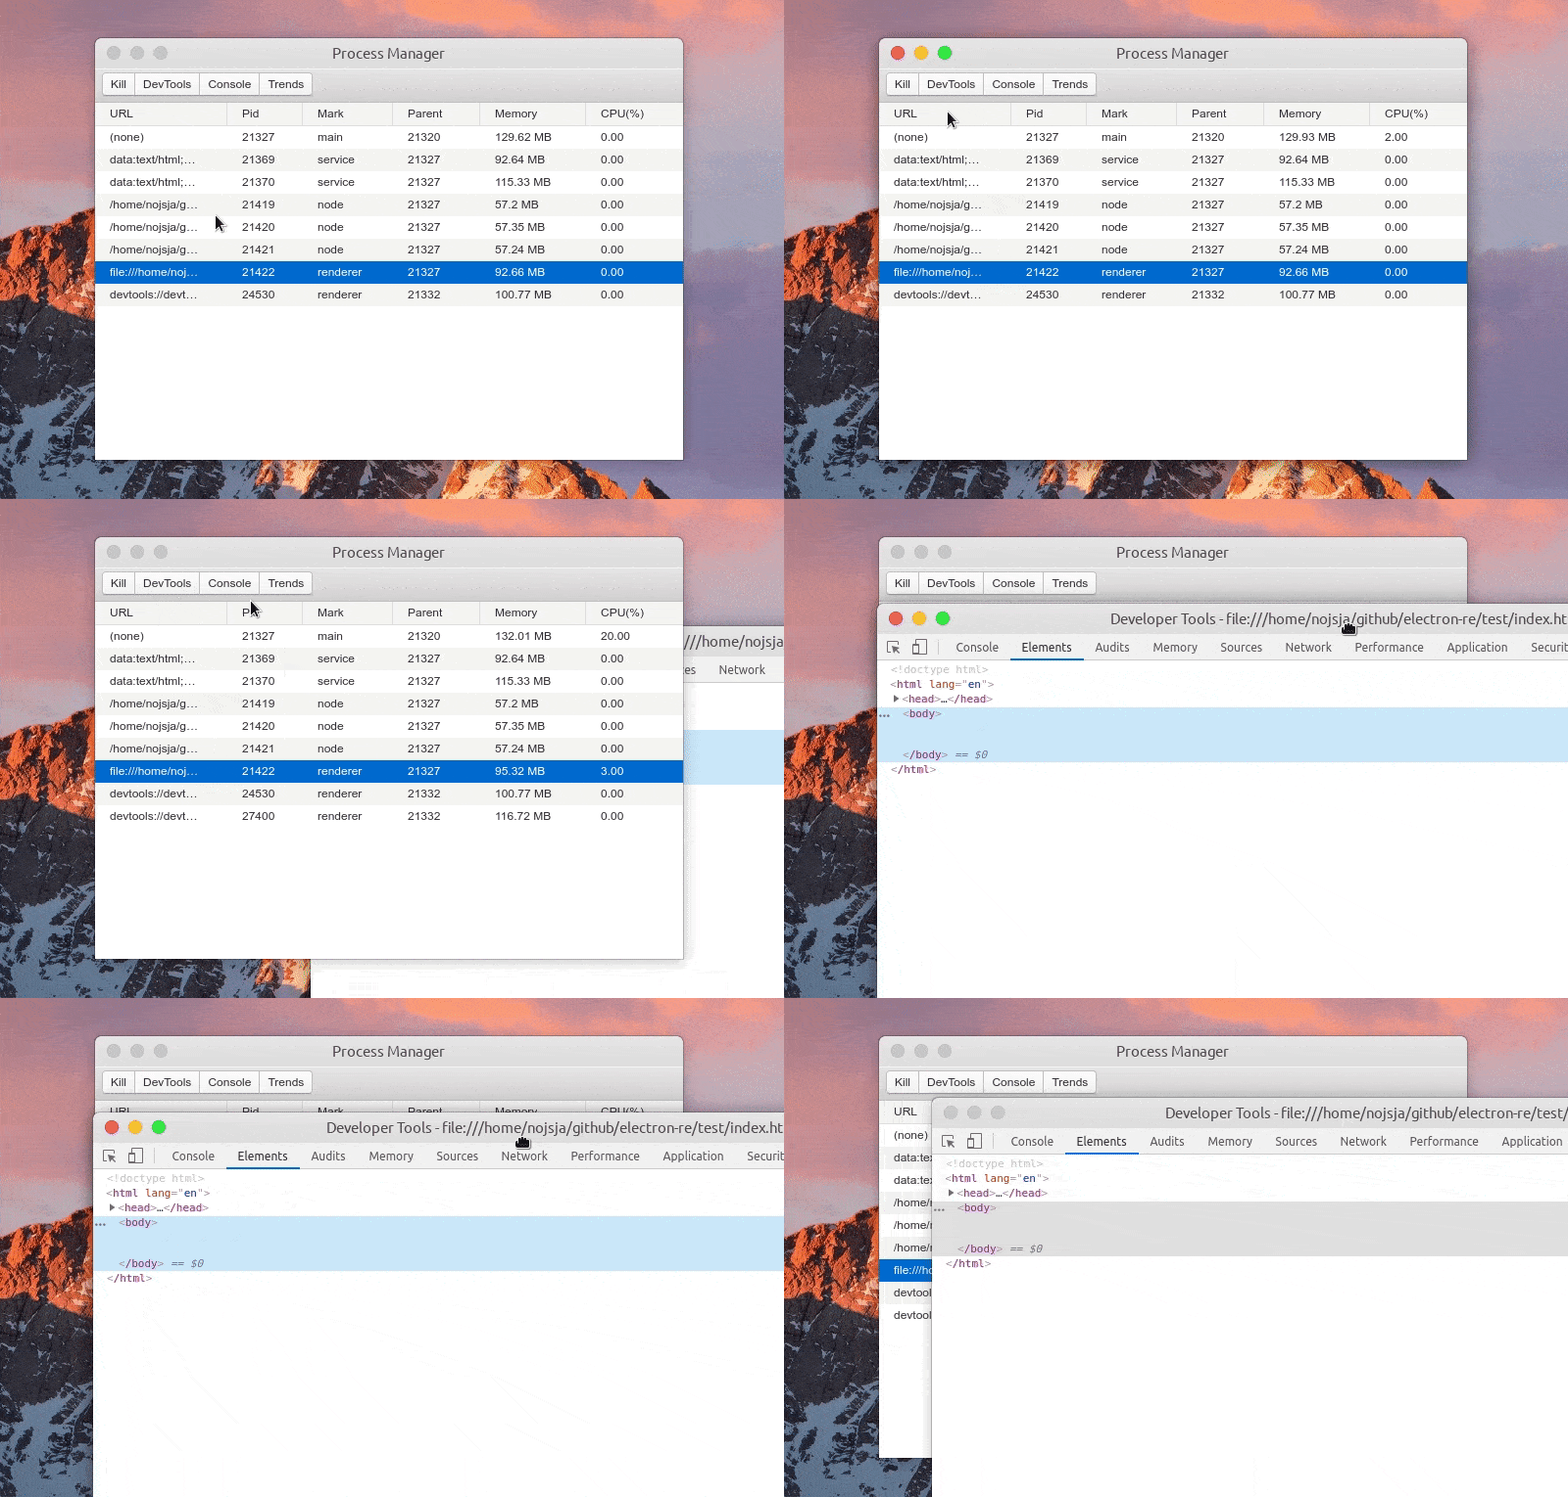
主界面 UI参考 electron-process-manager 设计
预览图:
主要功能如下:
展示 Electron 应用中所有开启的进程,包括主进程、普通的渲染进程、Service 进程(electron-re 引入)、ChildProcessPool 创建的子进程(electron-re 引入)。
进程列表中显示各个进程进程号、进程标识、父进程号、内存占用大小、CPU 占用百分比等,所有进程标识分为:main(主进程)、service(服务进程)、renderer(渲染进程)、node(进程池子进程),点击表格头可以针对对某项进行递增/递减排序。
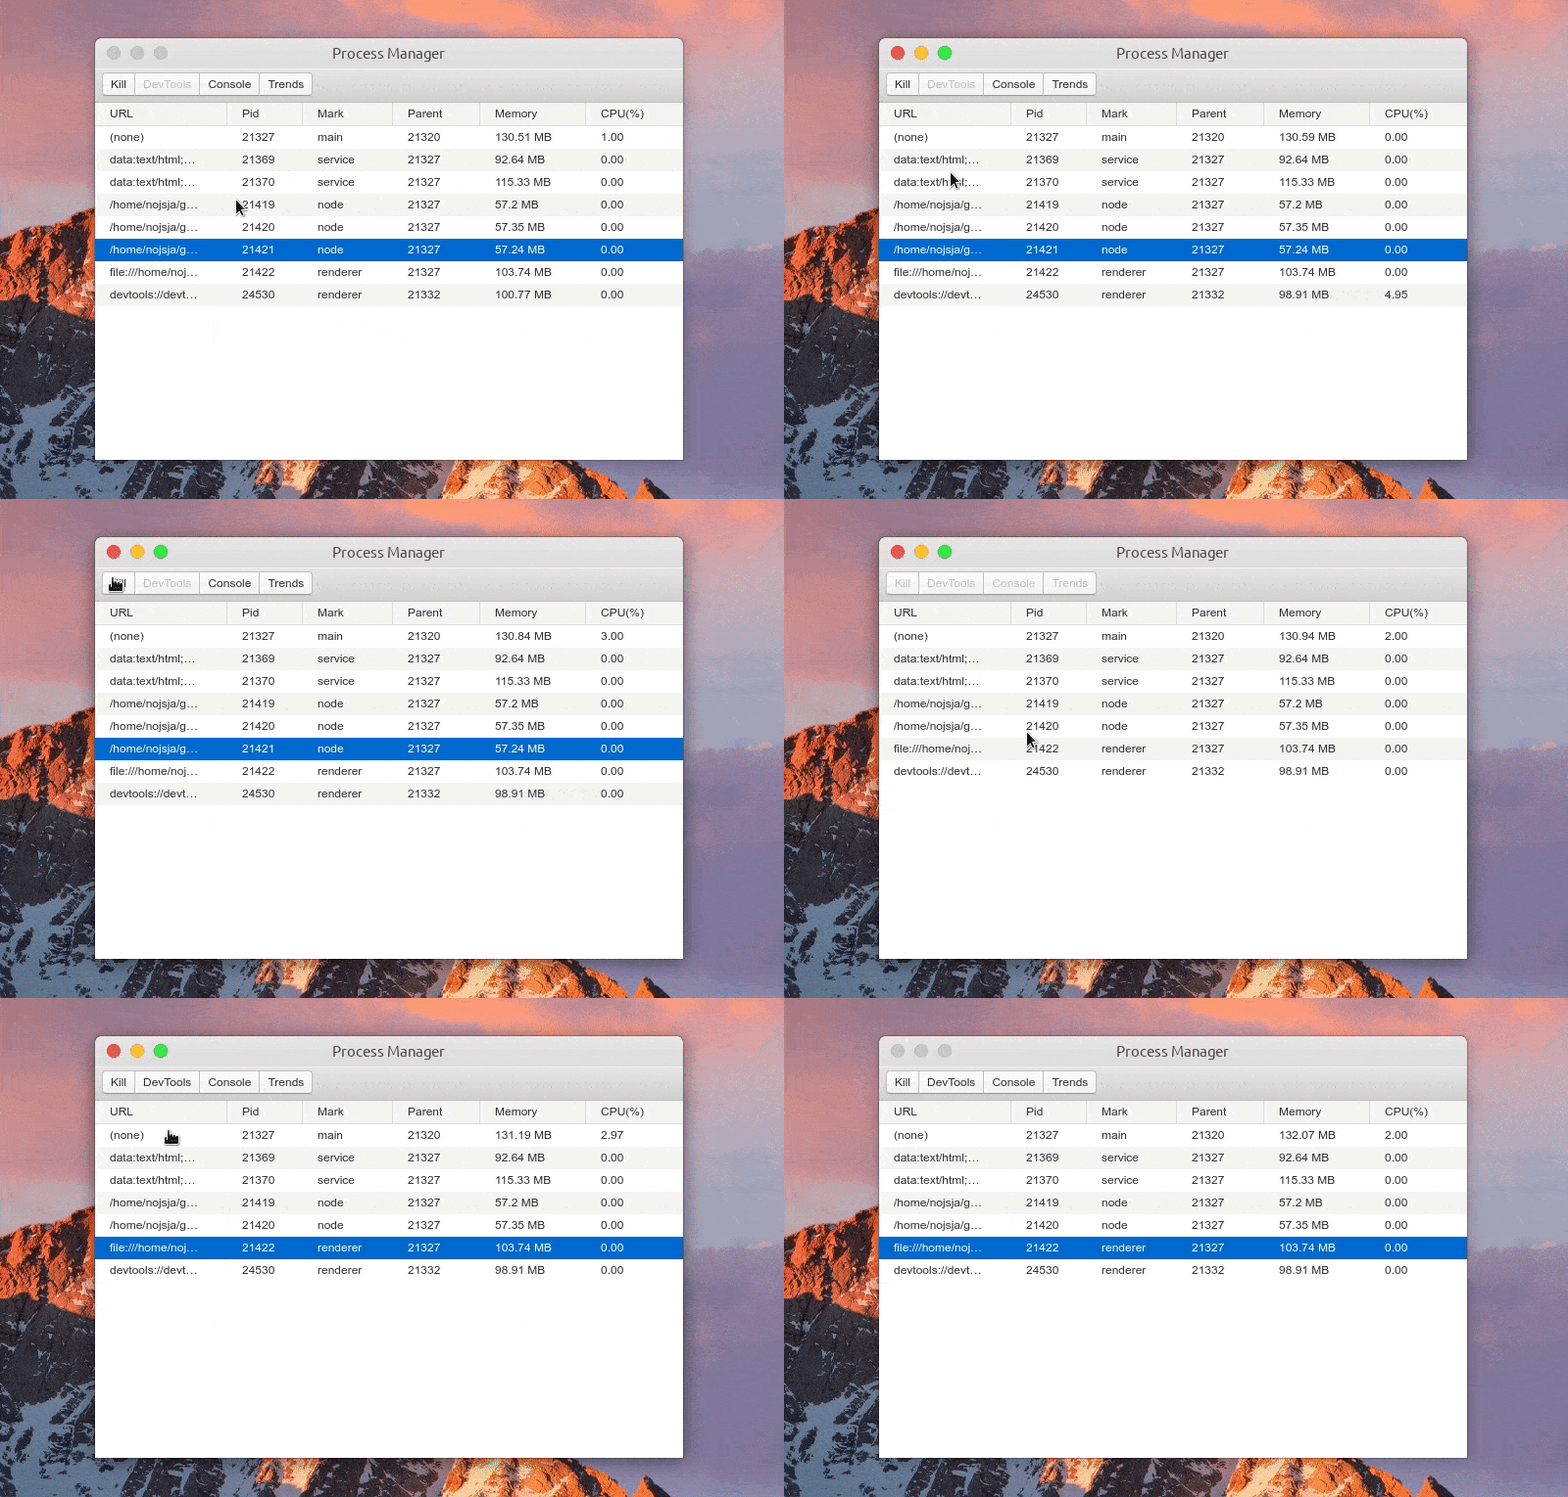
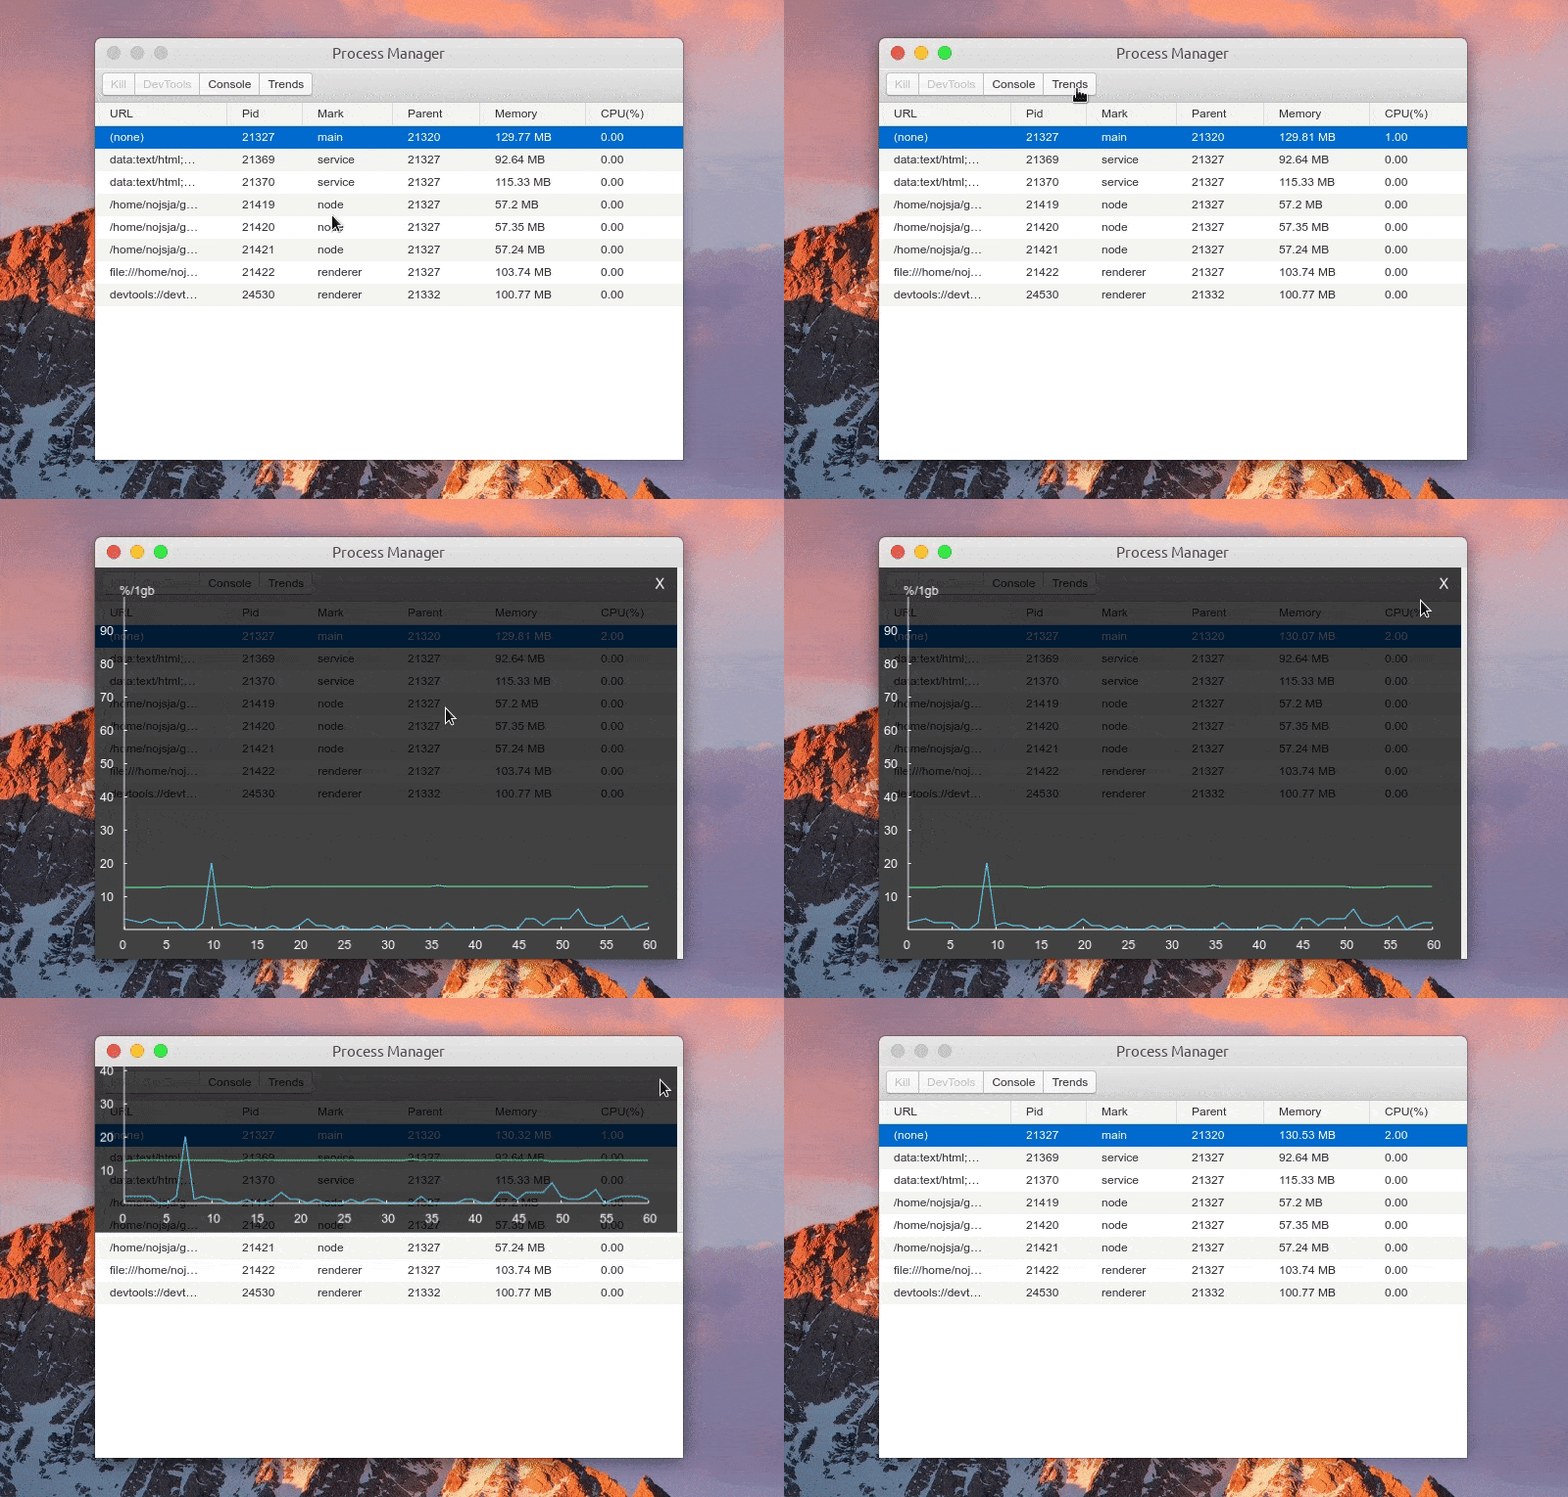
选中某个进程后可以 Kill 此进程、查看进程控制台 Console 数据、查看1分钟内进程 CPU/Memory 占用趋势,如果此进程是渲染进程的话还可以通过 DevTools 按钮一键打开内置调试工具。
ChildProcessPool 创建的子进程暂不支持直接打开 DevTools 进行调试,不过由于创建子进程时添加了 --inspect 参数,可以使用 chrome 的 chrome://inspect 进行远程调试。
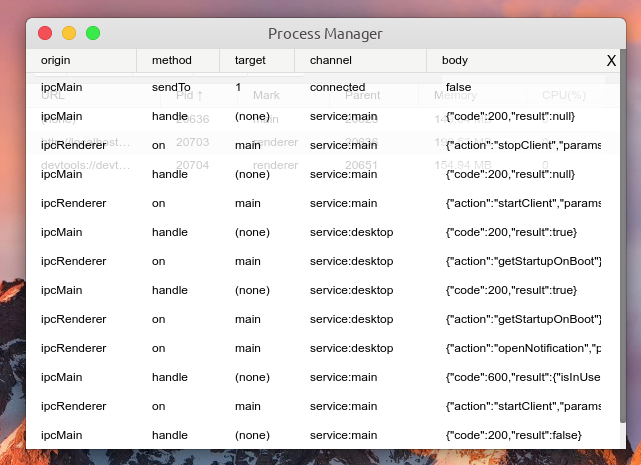
点击 Signals 按钮可以查看 MessageChannel 工具的请求发送日志,包括简单的请求参数、请求名、请求返回数据等。
功能:Kill 进程
功能:查看进程日志
功能:查看进程 CPU/Memory 占用趋势
功能:查看 MessageChannel 请求发送日志
V. 新特性:进程池负载均衡 简化的初版实现
>> 代码地址
➣ 关于负载均衡 “ 负载均衡,英文名称为 Load Balance,其含义就是指将负载(工作任务)进行平衡、分摊到多个操作单元上进行运行,例如 FTP 服务器、Web服务器、企业核心应用服务器和其它主要任务服务器等,从而协同完成工作任务。
➣ 负载均衡策略说明 之前的实现中,进程池创建好后,当使用 pool 发送请求时,采用两种方式处理请求发送策略:
默认使用轮询策略选择一个子进程处理请求,只能保证基本的请求平均分配。
另一种使用情况是通过手动指定发送请求时的额外参数 id:pool.send(channel, params, id),这样子让 id 相同的请求发送到同一个子进程上。一个适用情景就是:第一次我们向某个子进程发送请求,该子进程处理请求后在其运行时内存空间中存储了一些处理结果,之后某个情况下需要将之前那次请求产生的处理结果再次拿回主进程,这时候就需要使用 id 来区分请求。
新版本引入了一些负载均衡策略,包括:
POLLING - 轮询:子进程轮流处理请求WEIGHTS - 权重:子进程根据设置的权重来处理请求RANDOM - 随机:子进程随机处理请求SPECIFY - 指定:子进程根据指定的进程 id 处理请求WEIGHTS_POLLING - 权重轮询:权重轮询策略与轮询策略类似,但是权重轮询策略会根据权重来计算子进程的轮询次数,从而稳定每个子进程的平均处理请求数量。WEIGHTS_RANDOM - 权重随机:权重随机策略与随机策略类似,但是权重随机策略会根据权重来计算子进程的随机次数,从而稳定每个子进程的平均处理请求数量。MINIMUM_CONNECTION - 最小连接数:选择子进程上具有最小连接活动数量的子进程处理请求。WEIGHTS_MINIMUM_CONNECTION - 权重最小连接数:权重最小连接数策略与最小连接数策略类似,不过各个子进程被选中的概率由连接数和权重共同决定。➣ 负载均衡策略的简易实现 参数说明:
tasks:任务数组,一个示例:[{id: 11101, weight: 2}, {id: 11102, weight: 1}]。 currentIndex: 目前所处的任务索引,默认为 0,每次调用时会自动加 1,超出任务数组长度时会自动取模。 context:主进程参数上下文,用于动态更新当前任务索引和权重索引。 weightIndex:权重索引,用于权重策略,默认为 0,每次调用时会自动加 1,超出权重总和时会自动取模。 weightTotal:权重总和,用于权重策略相关计算。 connectionsMap:各个进程活动连接数的映射,用于最小连接数策略相关计算。 1. 轮询策略(POLLING) 原理:索引值递增,每次调用时会自动加 1,超出任务数组长度时会自动取模,保证平均调用。
1 2 3 4 5 6 7 8 9 10 module .exports = function (tasks, currentIndex, context ) { if (!tasks.length ) return null ; const task = tasks[currentIndex]; context.currentIndex ++; context.currentIndex %= tasks.length ; return task || null ; };
2. 权重策略(WEIGHTS) 原理:每个进程根据 (权重值 + (权重总和 * 随机因子)) 生成最终计算值,最终计算值中的最大值被命中。
1 2 3 4 5 6 7 8 9 10 11 12 13 14 15 16 17 18 19 20 module .exports = function (tasks, weightTotal, context ) { if (!tasks.length ) return null ; let max = tasks[0 ].weight , maxIndex = 0 , sum; for (let i = 0 ; i < tasks.length ; i++) { sum = (tasks[i].weight || 0 ) + Math .random () * weightTotal; if (sum >= max) { max = sum; maxIndex = i; } } context.weightIndex += 1 ; context.weightIndex %= (weightTotal + 1 ); return tasks[maxIndex]; };
3. 随机策略(RANDOM) 原理:随机函数在 [0, length) 中任意选取一个索引即可
1 2 3 4 5 6 7 8 module .exports = function (tasks ) { const length = tasks.length ; const target = tasks[Math .floor (Math .random () * length)]; return target || null ; };
4. 权重轮询策略(WEIGHTS_POLLING) 原理:类似轮询策略,不过轮询的区间为:[最小权重值, 权重总和],根据各项权重累加值进行命中区间计算。每次调用时权重索引会自动加 1,超出权重总和时会自动取模。
1 2 3 4 5 6 7 8 9 10 11 12 13 14 15 16 17 18 19 20 21 module .exports = function (tasks, weightIndex, weightTotal, context ) { if (!tasks.length ) return null ; let weight = 0 ; let task; for (let i = 0 ; i < tasks.length ; i++) { weight += tasks[i].weight || 0 ; if (weight >= weightIndex) { task = tasks[i]; break ; } } context.weightIndex += 1 ; context.weightIndex %= (weightTotal + 1 ); return task; };
5. 权重随机策略(WEIGHTS_RANDOM) 原理:由 (权重总和 * 随机因子) 产生计算值,将各项权重值与其相减,第一个不大于零的最终值即被命中。
1 2 3 4 5 6 7 8 9 10 11 12 13 14 15 module .exports = function (tasks, weightTotal ) { let task; let weight = Math .ceil (Math .random () * weightTotal); for (let i = 0 ; i < tasks.length ; i++) { weight -= tasks[i].weight || 0 ; if (weight <= 0 ) { task = tasks[i]; break ; } } return task || null ; };
6. 最小连接数策略(MINIMUM_CONNECTION) 原理:直接选择当前连接数最小的项即可。
1 2 3 4 5 6 7 8 9 10 11 12 13 14 15 16 17 module .exports = function (tasks, connectionsMap={} ) { if (tasks.length < 2 ) return tasks[0 ] || null ; let min = connectionsMap[tasks[0 ].id ]; let minIndex = 0 ; for (let i = 1 ; i < tasks.length ; i++) { const con = connectionsMap[tasks[i].id ] || 0 ; if (con <= min) { min = con; minIndex = i; } } return tasks[minIndex] || null ; };
7. 权重最小连接数(WEIGHTS_MINIMUM_CONNECTION) 原理:权重 + ( 随机因子 * 权重总和 ) + ( 连接数占比 * 权重总和 ) 三个因子,计算出最终值,根据最终值的大小进行比较,最小值所代表项即被命中。
1 2 3 4 5 6 7 8 9 10 11 12 13 14 15 16 17 18 19 20 21 22 23 24 25 26 27 28 module .exports = function (tasks, weightTotal, connectionsMap, context ) { if (!tasks.length ) return null ; let min = tasks[0 ].weight , minIndex = 0 , sum; const connectionsTotal = tasks.reduce ((total, cur ) => { total += (connectionsMap[cur.id ] || 0 ); return total; }, 0 ); for (let i = 0 ; i < tasks.length ; i++) { sum = (tasks[i].weight || 0 ) + (Math .random () * weightTotal) + (( (connectionsMap[tasks[i].id ] || 0 ) * weightTotal ) / connectionsTotal); if (sum <= min) { min = sum; minIndex = i; } } context.weightIndex += 1 ; context.weightIndex %= (weightTotal + 1 ); return tasks[minIndex]; };
➣ 负载均衡器的实现 代码都不复杂,有几点需要说明:
params 对象保存了用于各种策略计算的一些参数,比如权重索引、权重总和、连接数、CPU/Memory占用等等。scheduler 对象用于调用各种策略进行计算,scheduler.calculate() 会返回一个命中的进程 id。targets 即所有用于计算的目标进程,不过其中仅存放了目标进程 pid 和 其权重 weight:[{id: [pid], weight: [number]}, ...]。algorithm 为特定的负载均衡策略,默认值为轮询策略。ProcessManager.on(‘refresh’, this.refreshParams) ,负载均衡器通过监听 ProcessManager 的 refresh 事件来定时更新各个进程的计算参数。ProcessManager 中有一个定时器,每隔一段时间就会采集一次各个被监听的进程的资源占用情况,并携带采集数据触发一次 refresh 事件。1 2 3 4 5 6 7 8 9 10 11 12 13 14 15 16 17 18 19 20 21 22 23 24 25 26 27 28 29 30 31 32 33 34 35 36 37 38 39 40 41 42 43 44 45 46 47 48 49 50 51 52 53 54 55 56 57 58 59 60 61 62 63 64 65 66 67 68 69 70 71 72 73 74 75 76 77 78 79 80 81 82 83 84 85 86 87 88 89 90 91 92 93 94 95 96 97 98 99 100 101 102 103 104 105 106 107 108 109 110 111 112 113 const CONSTS = require ("./consts" );const Scheduler = require ("./scheduler" );const { RANDOM , POLLING , WEIGHTS , SPECIFY , WEIGHTS_RANDOM , WEIGHTS_POLLING , MINIMUM_CONNECTION , WEIGHTS_MINIMUM_CONNECTION , } = CONSTS ; const ProcessManager = require ('../ProcessManager' );class LoadBalancer { constructor (options ) { this .targets = options.targets ; this .algorithm = options.algorithm || POLLING ; this .params = { currentIndex : 0 , weightIndex : 0 , weightTotal : 0 , connectionsMap : {}, cpuOccupancyMap : {}, memoryOccupancyMap : {}, }; this .scheduler = new Scheduler (this .algorithm ); this .memoParams = this .memorizedParams (); this .calculateWeightIndex (); ProcessManager .on ('refresh' , this .refreshParams ); } memorizedParams = () => { return { [RANDOM ]: () => [], [POLLING ]: () => [this .params .currentIndex , this .params ], [WEIGHTS ]: () => [this .params .weightTotal , this .params ], [SPECIFY ]: (id ) => [id], [WEIGHTS_RANDOM ]: () => [this .params .weightTotal ], [WEIGHTS_POLLING ]: () => [this .params .weightIndex , this .params .weightTotal , this .params ], [MINIMUM_CONNECTION ]: () => [this .params .connectionsMap ], [WEIGHTS_MINIMUM_CONNECTION ]: () => [this .params .weightTotal , this .params .connectionsMap , this .params ], }; } refreshParams = (pidMap ) => { ... } pickOne = (...params ) => { return this .scheduler .calculate ( this .targets , this .memoParams [this .algorithm ](...params) ); } pickMulti = (count = 1 , ...params ) => { return new Array (count).fill ().map ( () => this .pickOne (...params) ); } calculateWeightIndex = () => { this .params .weightTotal = this .targets .reduce ((total, cur ) => total + (cur.weight || 0 ), 0 ); if (this .params .weightIndex > this .params .weightTotal ) { this .params .weightIndex = this .params .weightTotal ; } } calculateIndex = () => { if (this .params .currentIndex >= this .targets .length ) { this .params .currentIndex = (ths.params .currentIndex - 1 >= 0 ) ? (this .params .currentIndex - 1 ) : 0 ; } } clean = (id ) => { ... } add = (task ) => {...} del = (target ) => {...} wipe = () => {...} updateParams = (object ) => { Object .entries (object).map (([key, value] ) => { if (key in this .params ) { this .params [key] = value; } }); } setTargets = (targets ) => {...} setAlgorithm = (algorithm ) => {...} } module .exports = Object .assign (LoadBalancer , { ALGORITHM : CONSTS });
➣ 进程池配合 LoadBalancer 来实现负载均衡 有几点需要说明:
当我们使用 pool.send('channel', params) 时,pool 内部 getForkedFromPool() 函数会被调用,函数从进程池中选择一个进程来执行任务,如果子进程数未达到最大设定数,则优先创建一个子进程来处理请求。 子进程 创建/销毁/退出 时需要同步更新 LoadBalancer 中监听的 targets,否则已被销毁的进程 pid 可能会在执行负载均衡策略计算后被返回。 ForkedProcess 是一个装饰器类,封装了 child_process.fork 逻辑,为其增加了一些额外功能,如:进程睡眠、唤醒、绑定事件、发送请求等基本方法。1 2 3 4 5 6 7 8 9 10 11 12 13 14 15 16 17 18 19 20 21 22 23 24 25 26 27 28 29 30 31 32 33 34 35 36 37 38 39 40 41 42 43 44 45 46 47 48 49 50 51 52 53 54 55 56 57 58 59 60 61 62 63 64 65 66 67 68 69 70 71 72 73 74 75 76 77 78 79 80 81 82 83 84 85 86 87 88 89 90 91 92 93 94 95 96 97 98 99 100 101 102 103 104 105 106 107 108 109 110 111 112 113 114 115 116 117 118 119 120 121 122 123 124 125 126 127 128 129 130 131 132 133 134 135 136 137 138 139 140 141 142 143 144 145 146 147 148 const _path = require ('path' );const EventEmitter = require ('events' );const ForkedProcess = require ('./ForkedProcess' );const ProcessLifeCycle = require ('../ProcessLifeCycle.class' );const ProcessManager = require ('../ProcessManager/index' );const { defaultLifecycle } = require ('../ProcessLifeCycle.class' );const LoadBalancer = require ('../LoadBalancer' );let { inspectStartIndex } = require ('../../conf/global.json' );const { getRandomString, removeForkedFromPool, convertForkedToMap, isValidValue } = require ('../utils' );const { UPDATE_CONNECTIONS_SIGNAL } = require ('../consts' );const defaultStrategy = LoadBalancer .ALGORITHM .POLLING ;class ChildProcessPool extends EventEmitter { constructor ({ path, max=6 , cwd, env={}, weights=[], // weights of processes, the length is equal to max strategy=defaultStrategy, ... } ) { super (); this .cwd = cwd || _path.dirname (path); this .env = { ...process.env , ...env }; this .callbacks = {}; this .pidMap = new Map (); this .callbacksMap = new Map (); this .connectionsMap ={}; this .forked = []; this .connectionsTimer = null ; this .forkedMap = {}; this .forkedPath = path; this .forkIndex = 0 ; this .maxInstance = max; this .weights = new Array (max).fill ().map ( (_, i ) => (isValidValue (weights[i]) ? weights[i] : 1 ) ); this .LB = new LoadBalancer ({ algorithm : strategy, targets : [], }); this .initEvents (); } initEvents = () => { this .on ('forked_exit' , (pid ) => { this .onForkedDisconnect (pid); }); ... } onForkedCreate = (forked ) => { const pidsValue = this .forked .map (f =>pid ); const length = this .forked .length ; this .LB .add ({ id : forked.pid , weight : this .weights [length - 1 ], }); ProcessManager .listen (pidsValue, 'node' , this .forkedPath ); ... } onForkedDisconnect = (pid ) => { const length = this .forked .length ; removeForkedFromPool (this .forked , pid, this .pidMap ); this .LB .del ({ id : pid, weight : this .weights [length - 1 ], }); ProcessManager .unlisten ([pid]); ... } getForkedFromPool = (id="default" ) => { let forked; if (!this .pidMap .get (id)) { if (this .forked .length < this .maxInstance ) { inspectStartIndex ++; forked = new ForkedProcess ( this , this .forkedPath , this .env .NODE_ENV === "development" ? [`--inspect=${inspectStartIndex} ` ] : [], { cwd : this .cwd , env : { ...this .env , id }, stdio : 'pipe' } ); this .forked .push (forked); this .onForkedCreate (forked); } else { forked = this .forkedMap [this .LB .pickOne ().id ]; } if (id !== 'default' ) { this .pidMap .set (id, forked.pid ); } } else { forked = this .forkedMap [this .pidMap .get (id)]; } if (!forked) throw new Error (`Get forked process from pool failed! the process pid: ${this .pidMap.get(id)} .` ); return forked; } send = (taskName, params, givenId ) => { if (givenId === 'default' ) throw new Error ('ChildProcessPool: Prohibit the use of this id value: [default] !' ) const id = getRandomString (); const forked = this .getForkedFromPool (givenId); this .lifecycle .refresh ([forked.pid ]); return new Promise (resolve => this .callbacks [id] = resolve; forked.send ({action : taskName, params, id }); }); } ... } module .exports = ChildProcessPool ;
VI. 新特性:子进程智能启停 这个特性我也将其称为 进程生命周期 (lifecycle)。
主要作用是:当子进程一段时间未被调用,则自动进入休眠状态,减少 CPU 占用 (减少内存占用很难)。进入休眠状态的时间可以和由创建者控制,默认为 10 min。当子进程进入休眠后,如果有新的请求到来并分发到该休眠的进程上,则会自动唤醒该进程并继续处理当前请求。一段时间闲置后,将会再次进入休眠状态。
➣ 使进程休眠的各种方式 1)如果是让进程暂停的话,可以向进程发送 SIGSTOP 信号,发送 SIGCONT 信号可以恢复进程。
Node.js:
1 2 process.kill ([pid], "SIGSTOP" ); process.kill ([pid], "SIGCONT" );
Unix System (Windows 暂未测试):
1 2 kill -STOP [pid]kill -CONT [pid]
2)Node.js 新的 Atomic.wait API 也可以做到编程控制。该方法会监听一个 Int32Array 对象的给定下标下的值,若值未发生改变,则一直等待(阻塞 event loop),直到发生超时(由 ms 参数决定)。可以在主进程中操作这块共享数据,然后为子进程解除休眠锁定。
1 2 3 4 5 6 const nil = new Int32Array (new SharedArrayBuffer (4 ));const array = new Array (100000 ).fill (0 );setInterval (() => {console .log (1 );}, 1e3 ); Atomics .wait (nil, 0 , 0 , Number (600e3 ));
➣ 生命周期 LifeCycle 的实现 由于无可靠方案,LifeCycle 已经被弃用。
代码同样很简单,有几点需要说明:
采用了 标记清除法,子进程触发请求时更新调用时间,同时使用定时器循环计算各个被监听子进程的 ( 当前时间 - 上次调用时间) 差值。如果有超过设定的时间的进程则发送 sleep 信号,同时携带所有进程 pid。
每个 ChildProcessPool 进程池实例都会拥有一个 ProcessLifeCycle 实例对象用于控制当前进程池中的进程的 休眠/唤醒。ChildProcessPool 会监听 ProcessLifeCycle 对象的 sleep 事件,拿到需要 sleep 的进程 pid 后调用 ForkedProcess 的 sleep() 方法使其睡眠。下个请求分发到该进程时,会自动唤醒该进程。
1 2 3 4 5 6 7 8 9 10 11 12 13 14 15 16 17 18 19 20 21 22 23 24 25 26 27 28 29 30 31 32 33 34 35 36 37 38 39 40 41 42 43 44 45 46 47 48 49 50 51 52 53 54 55 56 57 58 59 60 61 62 63 64 65 66 67 68 69 70 71 72 73 74 75 76 77 78 79 80 const EventEmitter = require ('events' );const defaultLifecycle = { expect : 600e3 , internal : 30e3 }; class ProcessLifeCycle extends EventEmitter { constructor (options ) { super (); const { expect=defaultLifecycle.expect , internal=defaultLifecycle.internal } = options; this .timer = null ; this .internal = internal; this .expect = expect; this .params = { activities : new Map () }; } taskLoop = () => { if (this .timer ) return console .warn ('ProcessLifeCycle: the task loop is already running' ); this .timer = setInterval (() => { const sleepTasks = []; const date = new Date (); const { activities } = this .params ; ([...activities.entries ()]).map (([key, value] ) => { if (date - value > this .expect ) { sleepTasks.push (key); } }); if (sleepTasks.length ) { this .emit ('sleep' , sleepTasks); } }, this .internal ); } watch = (ids=[] ) => { ids.forEach (id => this .params .activities .set (id, new Date ()); }); } unwatch = (ids=[] ) => { ids.forEach (id => this .params .activities .delete (id); }); } stop = () => { clearInterval (this .timer ); this .timer = null ; } start = () => { this .taskLoop (); } refresh = (ids=[] ) => { ids.forEach (id => if (this .params .activities .has (id)) { this .params .activities .set (id, new Date ()); } else { console .warn (`The task with id ${id} is not being watched.` ); } }); } } module .exports = Object .assign (ProcessLifeCycle , { defaultLifecycle });
➣ 进程互斥锁的雏形 之前看文章时看到关于 API - Atomic.wait 的一篇文章,Atomic 除了用于实现进程睡眠,也能基于它来理解进程互斥锁的实现原理。这里有个基本雏形 可以作为参考,相关文档可以参阅 MDN 。
AsyncLock 对象需要在子进程中引入,创建 AsyncLock 的构造函数中有一个参数 sab 需要注意。这个参数是一个 SharedArrayBuffer 共享数据块,这个共享数据快需要在主进程创建,然后通过 IPC 通信发送到各个子进程,通常 IPC 通信会序列化一般的诸如 Object / Array 等数据,导致消息接受者和消息发送者拿到的不是同一个对象,但是经由 IPC 发送的 SharedArrayBuffer 对象却会指向同一个内存块。
在子进程中使用 SharedArrayBuffer 数据创建 AsyncLock 实例后,任意一个子进程对共享数据的修改都会导致其它进程内指向这块内存的 SharedArrayBuffer 数据内容变化,这就是我们使用它实现进程锁的基本要点。
先对 Atomic API 做个简单说明:
Atomics.compareExchange(typedArray, index, expectedValue, newValue) :Atomics.compareExchange() 静态方法会在数组的值与期望值相等的时候,将给定的替换值替换掉数组上的值,然后返回旧值。此原子操作保证在写上修改的值之前不会发生其他写操作。Atomics.waitAsync(typedArray, index, value[, timeout]) :静态方法 Atomics.wait() 确保了一个在 Int32Array 数组中给定位置的值没有发生变化且仍然是给定的值时进程将会睡眠,直到被唤醒或超时。该方法返回一个字符串,值为"ok", “not-equal”, 或 “timed-out” 之一。Atomics.notify(typedArray, index[, count]) :静态方法 Atomics.notify() 唤醒指定数量的在等待队列中休眠的进程,不指定 count 时默认唤醒所有。AsyncLock 即异步锁,等待锁释放的时候不会阻塞主线程。主要关注 executeAfterLocked() 这个方法,调用该方法并传入回调函数,该回调函数会在锁被获取后执行,并且在执行完毕后自动释放锁。其中一步的关键就是 tryGetLock() 函数,它返回了一个 Promise 对象,因此我们等待锁释放的逻辑在微任务队列中执行而并不阻塞主线程。
1 2 3 4 5 6 7 8 9 10 11 12 13 14 15 16 17 18 19 20 21 22 23 24 25 26 27 28 29 30 31 32 33 34 35 36 37 38 39 40 41 42 43 44 45 46 47 48 49 50 51 52 53 54 55 56 57 58 59 60 61 62 63 64 65 66 67 68 69 70 71 72 73 74 75 76 77 78 class AsyncLock { static INDEX = 0 ; static UNLOCKED = 0 ; static LOCKED = 1 ; constructor (sab ) { this .sab = sab; this .i32a = new Int32Array (sab); } lock ( while (true ) { const oldValue = Atomics .compareExchange ( this .i32a , AsyncLock .INDEX , AsyncLock .UNLOCKED , AsyncLock .LOCKED ); if (oldValue == AsyncLock .UNLOCKED ) { return ; } Atomics .wait ( this .i32a , AsyncLock .INDEX , AsyncLock .LOCKED ); } } unlock ( const oldValue = Atomics .compareExchange ( this .i32a , AsyncLock .INDEX , AsyncLock .LOCKED , AsyncLock .UNLOCKED ); if (oldValue != AsyncLock .LOCKED ) { throw new Error ('Tried to unlock while not holding the mutex' ); } Atomics .notify (this .i32a , AsyncLock .INDEX , 1 ); } executeAfterLocked (callback ) { const tryGetLock = async ( while (true ) { const oldValue = Atomics .compareExchange ( this .i32a , AsyncLock .INDEX , AsyncLock .UNLOCKED , AsyncLock .LOCKED ); if (oldValue == AsyncLock .UNLOCKED ) { callback (); this .unlock (); return ; } const result = Atomics .waitAsync ( this .i32a , AsyncLock .INDEX , AsyncLock .LOCKED ); await result.value ; } } tryGetLock (); } }
VII. 存在的已知问题 由于使用了 Electron 原生的 remote API,因此 electron-re 部分特性(Service 相关)不支持 Electron 14 以及以上版本(已经移除 remote),正考虑近期使用第三方 remote 库进行替代兼容。
容错处理做的不够好,这一块会成为之后的重要优化点。
采集进程池中活动连接数时采用了"调用计数"的方式。这个处理方法不太好,准确性也不够高,但是目前还未想到更好的解决方法用于统计子进程中活跃的连接数。我觉得还是要从底层进行解决,比如:宏任务和微任务队列、V8 虚拟机、垃圾回收、Libuv 底层原理、Node 进程和线程原理…
暂时没在 windows 平台测试进程休眠功能,win 平台本身不支持进程信号,但是 Node 提供了模拟支持,但是具体表现还需测试。
VIII. Next To Do IX. 几个实际使用示例 electronux - 我的一个Electron项目,使用了 BrowserService/MessageChannel,并且附带了ChildProcessPool/ProcessHost使用demo。
shadowsocks-electron - 我的另一个Electron 跨平台桌面应用项目,使用 electron-re 进行调试开发,并且在生产环境下可以打开 ProcessManager UI 用于 CPU/Memory 资源占用监控和请求日志查看。
file-slice-upload - 一个关于多文件分片并行上传的demo,使用了 ChildProcessPool and ProcessHost,基于 Electron@9.3.5开发。
也可直接查看 index.test.js 和 test 目录下的测试样例文件,包含了一些使用示例。
当然 github - README 也有相关说明项。
