使用 Node.js 实现 http(s) 代理服务器
I. Contents
II. 前言
最近在开发一款跨平台桌面软件 - shadowsocks-electron 时需要用到 Node.js 来实现 http(s) 代理服务器来转发客户端网络请求,为此加深学习了一下 http 协议,也浅显了解了 socks 代理的原理。


III. 理论基础
1. OSI 网络分层模型
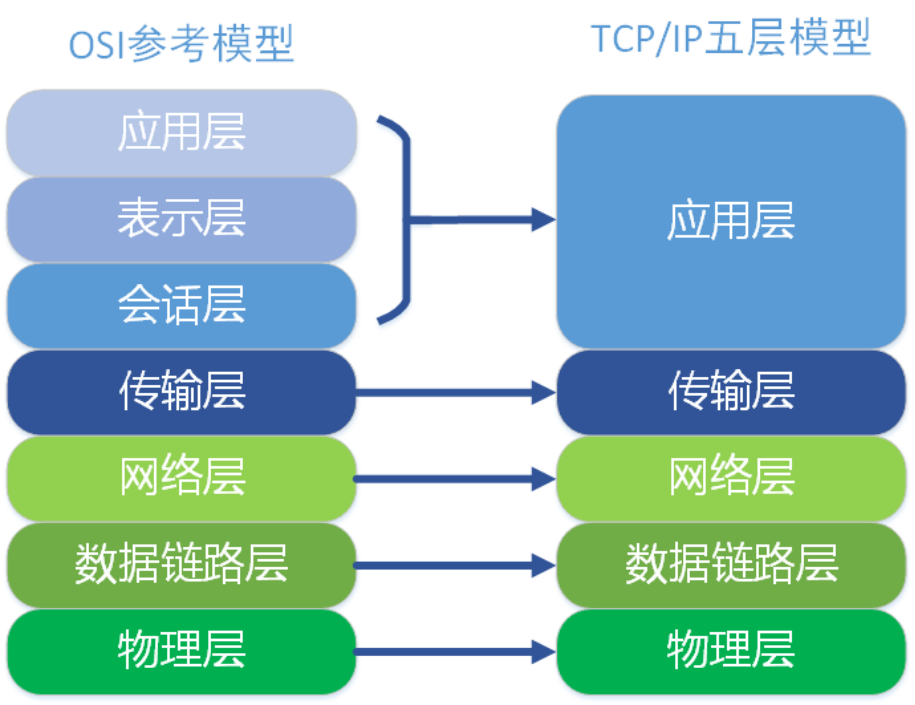
TCP/IP体系结构分为五层,将 OSI 模型的应用层、表示层和回话层统一为应用层,层次相对要简单得多。


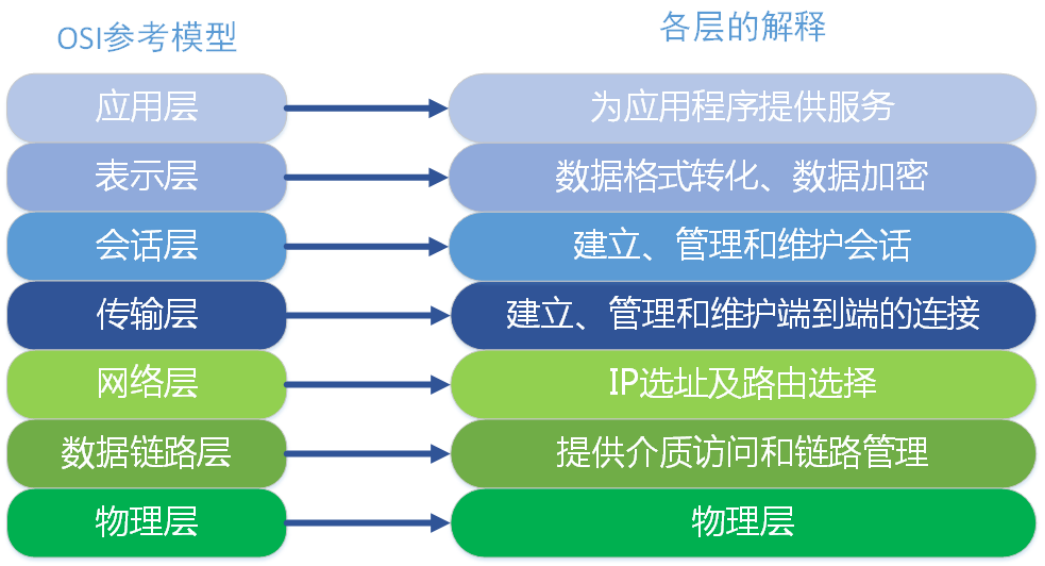
1)应用层: OSI参考模型中最靠近用户的一层,为应用程序提供网络服务。我们常见应用层的网络服务协议有:HTTP,HTTPS,FTP,POP3、SMTP等。
2)表示层: 提供各种用于应用层数据的编码和转换功能,确保一个系统的应用层发送的数据能被另一个系统的应用层识别。该层可提供一种标准表示形式,用于将计算机内部的多种数据格式转换成通信中采用的标准表示形式。数据压缩和加密也是表示层可提供的转换功能之一。
3)会话层: 负责建立、管理和终止表示层实体之间的通信会话。该层的通信由不同设备中的应用程序之间的服务请求和响应组成。
4)传输层: 提供面向连接或非面向连接的数据传递以及进行重传前的差错检测。包括处理差错控制和流量控制等问题,我们通常说的,TCP UDP就是在这一层。
5)网络层: 提供逻辑地址,供路由器确定路径。 本层通过IP寻址来建立两个节点之间的连接,为源端的运输层送来的分组,选择合适的路由和交换节点,正确无误地按照地址传送给目的端的运输层。就是通常说的IP层。这一层就是我们经常说的IP协议层。IP协议是Internet的基础。
6)数据链路层: 将比特组合成字节,再将字节组合成帧,使用链路层地址(以太网使用MAC地址)来访问介质,并进行差错检测。—MAC地址
7)物理层: 在设备之间传输比特流,规定了电平、速度和电缆针脚。常用设备有(各种物理设备)集线器、中继器、调制解调器、网线、双绞线、同轴电缆。这些都是物理层的传输介质。
整个通信过程中,从上到下的流程为:应用层的网络请求经过传输层加上TCP头,经过网络层加上端口号和IP源地址和目的地址等信息,经过数据链路层加上MAC头。从应用层开始每一层都加上自己的头部,上一层的数据体和头部成为本层的数据体,一层一层包裹,到达目的主机时,再反向从物理层开始向上逐层提取首部和数据体进行解析,并将数据体解析结果传递到上一层进行解析处理。
采用网络分层后,每一层都工作着不同的协议和实际的物理设备,下一层为上一层提供服务,上层的实现无需考虑下层的细节,相同层级之间进行相互通信。
2. HTTP 协议
HTTP 协议是工作在应用层的协议,HTTP协议定义Web客户端如何从Web服务器请求Web页面,以及服务器如何把Web页面传送给客户端。HTTP协议采用了请求/响应模型。客户端向服务器发送一个请求报文,请求报文包含请求的方法、URL、协议版本、请求头部和请求数据。服务器以一个状态行作为响应,响应的内容包括协议的版本、成功或者错误代码、服务器信息、响应头部和响应数据。
HTTP 要传送一条报文时,会以流的形式将报文数据的内容通过一条打开的 TCP 连接按序传输。TCP 收到数据流之后,会将数据流砍成被称作段的小数据块,并将段封装在 IP 分组中,通过因特网进行传输,所有这些工作都是由 TCP/IP 软件来处理的。
以下是 HTTP 请求/响应的步骤:
1)客户端连接到Web服务器
应用层 HTTP 协议需要依赖位于传输层的 TCP/IP 协议进行通信传输报文数据。一个HTTP客户端,通常是浏览器,与Web服务器的HTTP端口(默认为80)建立一个TCP套接字连接。套接字允许用户创建 TCP 的端点数据结构,将这些端点与远程服务器的 TCP 端点进行连接,并对数据流进行读写。TCP API 隐藏了所有底层网络协议的握手细节,以及 TCP 数据流与 IP 分组之间的分段和重装细节。
2)发送HTTP请求
通过TCP套接字,客户端向Web服务器发送一个文本的请求报文,一个请求报文由请求行、请求头部、空行和请求数据4部分组成。
3)服务器接受请求并返回HTTP响应
Web服务器解析请求,定位请求资源。服务器将数据写到TCP套接字,由客户端读取。一个响应由状态行、响应头部、空行和响应数据4部分组成。
4)释放连接TCP连接
若connection 模式为close,则服务器主动关闭TCP连接,客户端被动关闭连接,释放TCP连接;若connection 模式为keepalive,则该连接会保持一段时间,在该时间内可以继续接收请求;
IV. 功能实现
1. 代理服务器概念
HTTP 的代理服务器既是 Web 服务器又是 Web 客户端。HTTP 客户端会向代理发送请求报文,代理服务器必须像 Web 服务器一样,正确地处理请求和连接,然后返回响应。同时,代理自身要向服务器发送请求,这样,其行为就必须像正确的 HTTP 客户端一样,要发送请求并接收响应。如果要创建自己的 HTTP 代理,就要认真地遵循为 HTTP 客户端和 HTTP 服务器制定的规则。
2. 实现步骤解析
➣ 创建 HTTP 中间服务器
Node.js 的 http 模块可以用于创建 HTTP 服务器,这个服务器可以监听某个特殊端口,然后为客户端提供中转服务,客户端只需要往这个服务端口发送 HTTP 请求,然后等待代理服务器响应即可。
1
2
3
4
5
6
7
8
9
10
11
12
13
14
15
16
17
18
19
20
21
22
| ...
class HttpProxyServer extends EventEmitter {
...
private error(error: Error | null) {
...
}
start() {
if (!this.http) {
this.http = http.createServer();
this.http
...
.on('error', this.error)
.listen(this.socksConf.listenPort, this.socksConf.listenHost);
}
}
stop() {
this?.http?.close();
}
}
|
➣ 处理来自客户端的 HTTP 请求
中转 HTTP 请求比较容易,因为不涉及 HTTP 加密传输和证书校验的问题。我们只需要使用 HTTP Server 的 request 事件接收客户端的请求,然后解析请求的目标服务器信息,然后在中间服务器上再以客户端的身份创建到目标服务器的 HTTP 连接。
创建连接后,先将客户端请求对象(可读流)通过管道连接到新的请求连接(可写流)上,并且监听请求对象的 response 响应事件,响应事件触发后将拿到的响应对象(可读流)通过管道连接到客户端的响应对象(可读流)即可。
整个代理流程相当于正向代理,我们先解析客户端的请求信息和请求数据,然后再替代客户端进行请求,将拿到的目标服务器的响应数据回写到客户端的响应对象上。
提示:示例中 http.Agent 属性表示的对象是使用 socks5 协议实现的代理服务用于绕过特殊流量检测,如果不需要绕过流量检测不使用它也可。
1
2
3
4
5
6
7
8
9
10
11
12
13
14
15
16
17
18
19
20
21
22
23
24
25
26
27
28
29
30
31
32
33
34
35
36
37
38
39
40
41
42
43
44
45
46
47
48
49
50
51
52
53
54
55
56
57
58
59
60
61
62
63
64
| ...
class HttpProxyServer extends EventEmitter {
...
private error(error: Error | null) {
...
}
private request = (req: http.IncomingMessage, res: http.ServerResponse) => {
const u = url.parse(req.url || '')
console.log('request: ', req.url);
const pRequest = http.request({
host: u.host,
port: u.port,
path: u.path,
method: req.method,
headers: req.headers,
agent: new socks.Agent({
proxy: this.agentConf,
target: { host: u.host, port: u.port }
})
});
pRequest
.on('response', (pRes: http.ServerResponse) => {
res.writeHead(pRes.statusCode, (pRes as any).headers);
pRes.pipe(res);
})
.on('error', () => {
res.writeHead(500);
res.end('Connection error\n')
res.end();
});
req.pipe(pRequest);
}
start() {
if (!this.http) {
this.http = http.createServer();
this.http
...
.on('request', this.request)
.on('error', this.error)
.listen(this.socksConf.listenPort, this.socksConf.listenHost);
}
}
stop() {
this?.http?.close();
}
}
|
➣ 处理来自客户端的 HTTPS 请求
这里需要了解 HTTP 隧道代理的相关理论知识:
隧道(tunnel)建立起来之后,就会在两条连接之间对原始数据进行盲转发的 HTTP 应用程序。HTTP 隧道通常用来在一条或多条 HTTP 连接上转发非 HTTP 数据,转发时不会窥探数据。 HTTP 隧道的一种常见用途是通过 HTTP 连接承载加密的安全套接字层(SSL, Secure Sockets Layer)流量,这样 SSL 流量就可以穿过只允许 Web 流量通过的防火墙了。
我们的中转服务器(此时视为隧道网关)通过监听来自客户端的 connect 请求事件,解析出解析的目标服务器地址信息,然后建立 TCP 连接用于客户端和目标服务器的通信,请求和响应 Socket 同样需要通过管道进行连接。一旦建立了 TCP 连接,中间服务器发送一条 HTTP 200 Connection Established 响应来通知客户端,此时,HTTP 隧道就建立起来了。
客户端通过 HTTP 中转服务器的所有数据都会被直接转发给 HTTP 隧道,服务器发送的所有数据都会通过 HTTP 隧道转发给客户端。
整个流程中转服务器不需要解密客户端的请求携带数据,只需要通过 TCP 连接转发数据即可,因此可以绕过 HTTPS 请求的安全层 TLS/SSL 进行数据盲转。
提示:示例中的 socks.createConnection 作用是通过 socks5 代理服务用于绕过特殊流量检测。如果不需要绕过流量检测的话使用 Node.js 的 net 模块也能实现类似的功能:net.connect(port, hostname, callback)。
1
2
3
4
5
6
7
8
9
10
11
12
13
14
15
16
17
18
19
20
21
22
23
24
25
26
27
28
29
30
31
32
33
34
35
36
37
38
39
40
41
42
43
44
45
46
47
48
49
50
51
52
53
54
55
56
57
58
59
60
61
62
63
64
65
66
| ...
class HttpProxyServer extends EventEmitter {
...
private error(error: Error | null) {
...
}
private connect = (request: http.IncomingMessage, cSocket: Duplex, head: Buffer) => {
const u = url.parse('http://' + request.url)
const { agentConf } = this;
const options = {
command: 'connect',
proxy: agentConf,
target: { host: u.hostname, port: u.port },
};
socks.createConnection(options, (error: Error | null, pSocket: Duplex) => {
if (error) {
cSocket.write(`HTTP/${request.httpVersion} 500 Connection error\r\n\r\n`);
return;
}
pSocket.pipe(cSocket);
cSocket.pipe(pSocket);
pSocket.write(head);
cSocket.write(`HTTP/${request.httpVersion} 200 Connection established\r\n\r\n`)
pSocket.resume();
});
}
start() {
if (!this.http) {
this.http = http.createServer();
this.http
...
.on('connect', this.connect)
.on('request', this.request)
.on('error', this.error)
.listen(this.socksConf.listenPort, this.socksConf.listenHost);
}
}
stop() {
this?.http?.close();
}
}
|
V. 完整源码
1
2
3
4
5
6
7
8
9
10
11
12
13
14
15
16
17
18
19
20
21
22
23
24
25
26
27
28
29
30
31
32
33
34
35
36
37
38
39
40
41
42
43
44
45
46
47
48
49
50
51
52
53
54
55
56
57
58
59
60
61
62
63
64
65
66
67
68
69
70
71
72
73
74
75
76
77
78
79
80
81
82
83
84
85
86
87
88
89
90
91
92
93
94
95
96
97
98
99
100
101
102
103
104
105
106
107
108
109
110
111
112
113
114
115
116
117
118
119
120
121
122
123
124
125
126
127
128
129
130
131
132
133
134
135
136
137
138
139
140
141
142
143
144
145
146
147
148
149
150
151
152
153
154
155
156
157
158
159
160
161
162
| import { EventEmitter } from 'events';
import url from 'url';
import http from 'http';
import { Duplex } from 'stream';
const socks = require('socks');
type ProxyProps = {
listenHost?: string
listenPort?: number
socksHost?: string
socksPort?: number
authname?: string | undefined | ''
authsecret?: string | undefined | ''
};
type AgentProps = {
ipaddress: string
port: number
type: 5 | 4
authentication: {
username: string | '' | undefined
password: string | '' | undefined
}
};
type SocksProps = {
listenHost: string,
listenPort: number,
socksHost: string,
socksPort: number
}
class HttpProxyServer extends EventEmitter {
socksConf: SocksProps
agentConf: AgentProps
http: http.Server | null
constructor(props: ProxyProps) {
super();
const socksConf: SocksProps = {
listenHost: '127.0.0.1',
listenPort: 1095,
socksHost: '127.0.0.1',
socksPort: 1080,
...props
};
const agentConf: AgentProps = {
ipaddress: socksConf.socksHost,
port: socksConf.socksPort,
type: 5,
authentication: {
username: props.authname ?? '',
password: props.authsecret ?? ''
}
};
this.socksConf = socksConf;
this.agentConf = agentConf;
this.http = null;
this.start.bind(this);
this.stop.bind(this);
}
private connect = (request: http.IncomingMessage, cSocket: Duplex, head: Buffer) => {
const u = url.parse('http://' + request.url)
console.log('connect: ', request.url);
const { agentConf } = this;
const options = {
command: 'connect',
proxy: agentConf,
target: { host: u.hostname, port: u.port },
};
socks.createConnection(options, (error: Error | null, pSocket: Duplex) => {
if (error) {
cSocket.write(`HTTP/${request.httpVersion} 500 Connection error\r\n\r\n`);
return;
}
pSocket.pipe(cSocket);
cSocket.pipe(pSocket);
pSocket.write(head);
cSocket.write(`HTTP/${request.httpVersion} 200 Connection established\r\n\r\n`)
pSocket.resume();
});
}
private request = (req: http.IncomingMessage, res: http.ServerResponse) => {
const u = url.parse(req.url || '')
console.log('request: ', req.url);
const pRequest = http.request({
host: u.host,
port: u.port,
path: u.path,
method: req.method,
headers: req.headers,
agent: new socks.Agent({
proxy: this.agentConf,
target: { host: u.host, port: u.port }
})
});
pRequest
.on('response', (pRes: http.ServerResponse) => {
res.writeHead(pRes.statusCode, (pRes as any).headers);
pRes.pipe(res);
})
.on('error', () => {
res.writeHead(500);
res.end('Connection error\n')
res.end();
});
req.pipe(pRequest);
}
private error(error: Error | null) {
console.log(error);
}
start() {
if (!this.http) {
this.http = http.createServer();
this.http
.on('connect', this.connect)
.on('request', this.request)
.on('error', this.error)
.listen(this.socksConf.listenPort, this.socksConf.listenHost);
}
}
stop() {
this?.http?.close();
}
}
export {
HttpProxyServer
};
|
VI. 参考
VII. 总结
通过开发 shadowsocks-electron 这个软件,对 HTTP 协议有了更深入的认识。很多东西在实践过程中才会激发更多思考,学会将零散的知识节点的联系起来,从而构建完善的知识体系。


